Telegram module: creating a chatbot and a channel
Connect your application to Telegram module and manage the bot to send messages to telegram channels.
The Telegram module lets you manage your telegram bot. It now features a Send Message business process block, which adds the function of sending messages to telegram channels.
For the module to work, you do not need to program the bot. You just need to create it, add it to the telegram channel, and correctly configure the Appmaster Studio components.
Create a bot
To create and manage your bots you need to use BotFather, a bot developed by the Telegram team.
Enter the username "botfather" in the search field - most likely, it will be the first in the list (1). Please note that the official bot has a blue confirmation icon with a checkmark next to its name (2). Under the "search", there will be many others, with the same names and similar usernames - just ignore them, you do not need them.
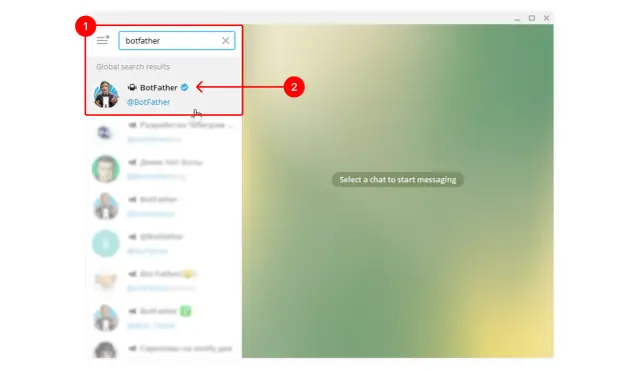
Click on the bot to open a chat with it (1), and click Start (2).
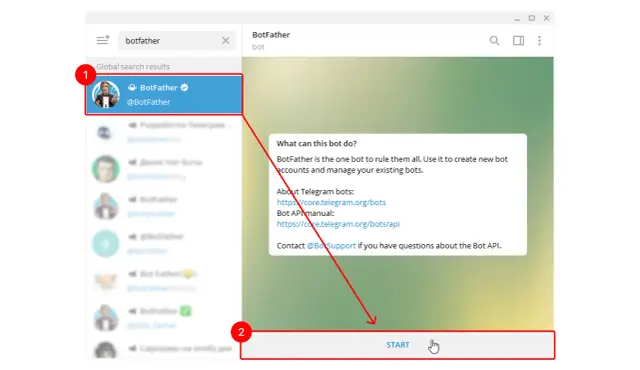
After that, the bot will start and display a list of commands in the message. To create a new bot, enter sequentially:
- the /newbot (1) command;
- the name of your bot, it can be anything (2);
- a unique username by which it can be easily found (3).
The bot has been created. BotFather will inform you about this in the message, it will indicate the username (4) and the authorization token (5).
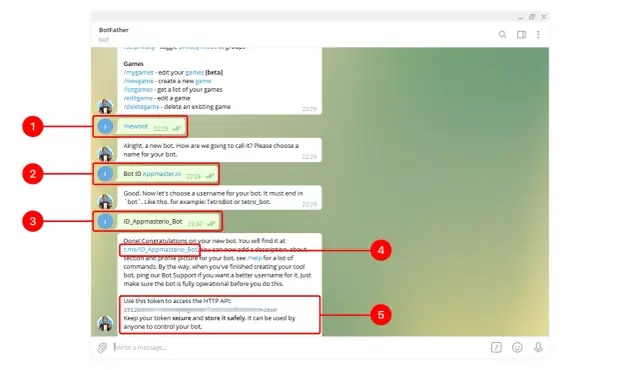
The token is needed to connect to various services and programs - it is used for Telegram to be able to identify your bot and determine what permissions it has.
Do not disclose the bot authorization token to outsiders and do not post it to the public. If a token has been declassified, you can revoke it (command /revoke) and generate a new one (command /token).
To integrate with Appmaster.io, you just need to add the bot to the telegram channel. You can also customize it to add additional functionality. More information about what a bot is, what it can do and how to set it up can be found on the official Telegram website. It contains both general information and instructions for developers.
Create a telegram channel
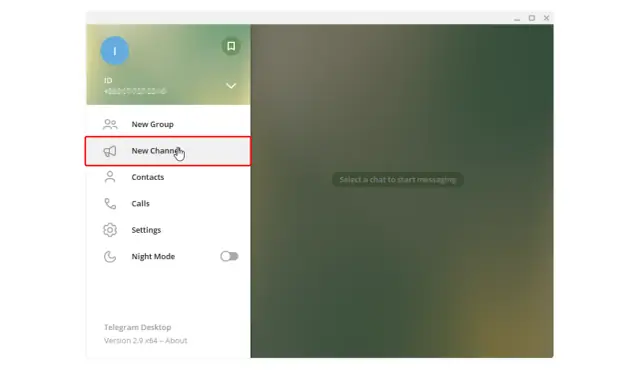
To create a channel, go to your account menu and click "New Channel".
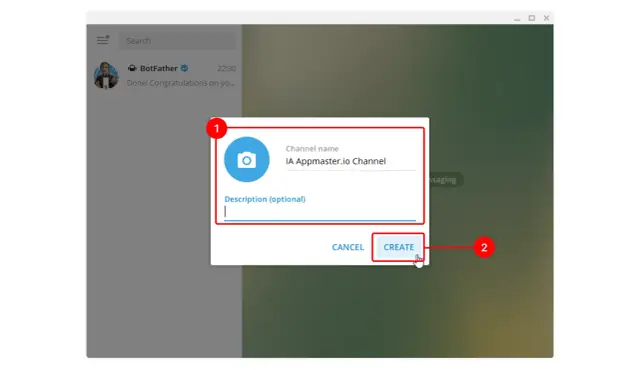
Enter the name of the channel, if you want - add a description (1). Click Create (2).
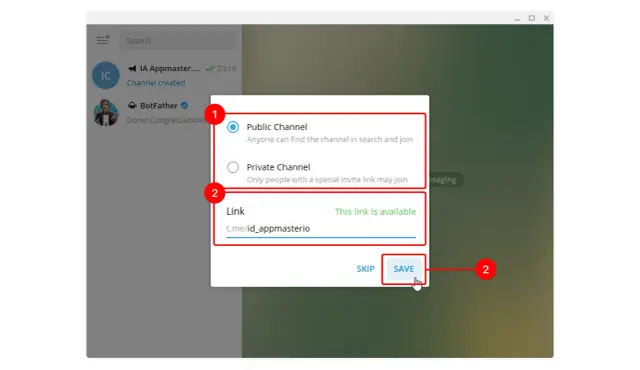
Choose whether your channel will be public-public or closed-private (1). Enter a unique link where you can find it (2). Save changes (3).
Add the bot to a channel
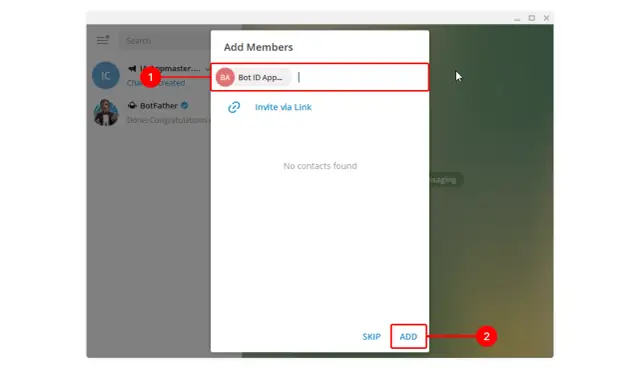
Immediately after creating a channel, Telegram will offer to add new users to it. Start entering your bot's username - it will appear in the search (1). Click on it (2).
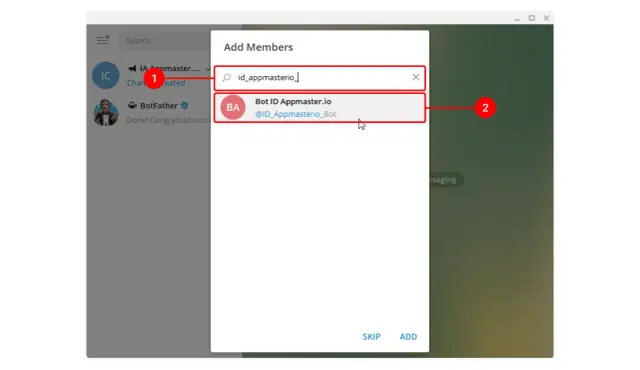
Your bot will appear in the list of users to add (1). Click Add to complete the configuration (2).
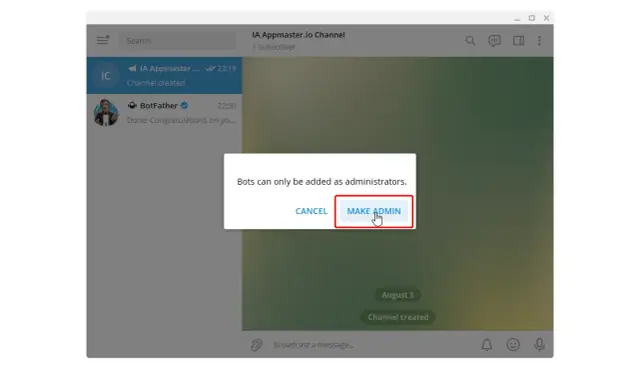
A message pops up that bots can only be added to channels as administrators. Agree to make the bot an administrator by clicking Make Admin.
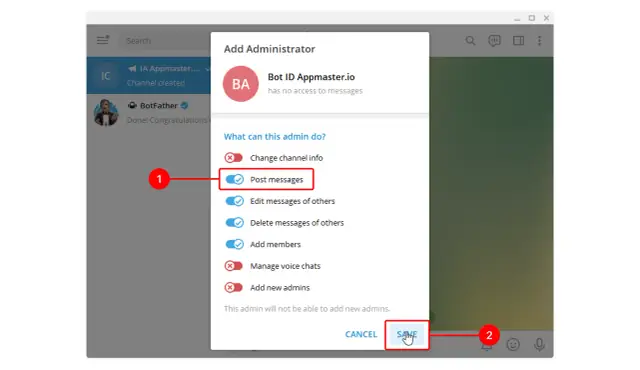
Now select the channel management permissions you want to give your bot. Choose whichever you prefer, but be sure to allow the bot to send messages by enabling the Post messages selector (1). Click Save (2).
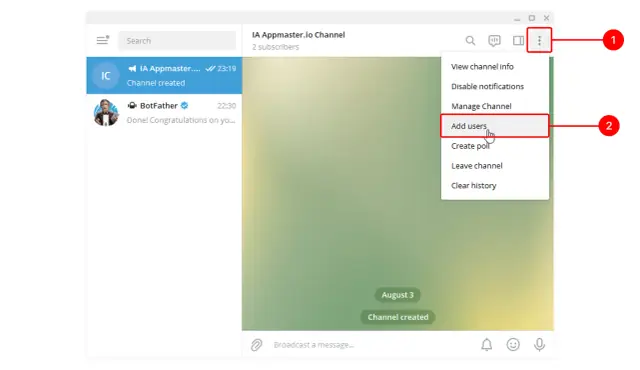
You can add a bot after creating a channel. To add a bot to an already created channel, open the settings (1) and click Add Users(2). Further - the same actions as in the previous paragraph.
Find data to configure
To add a bot to your application and send messages to a telegram channel, you need a bot authorization token and a channel address.
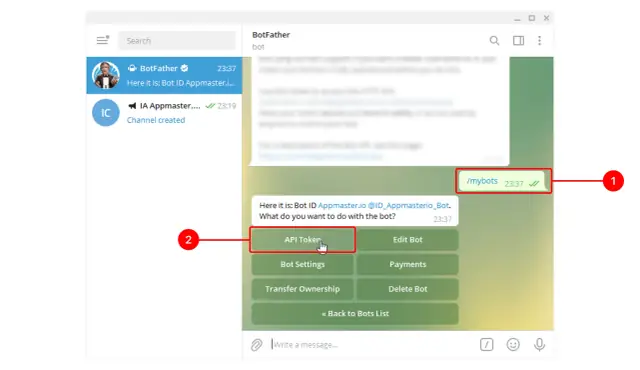
You can find out the bot token from BotFather: enter the command /mybots to get a list of all your bots (1) and select the one you need. A menu will appear, select the API token (2) item in it. BotFather will send you a message with a token.
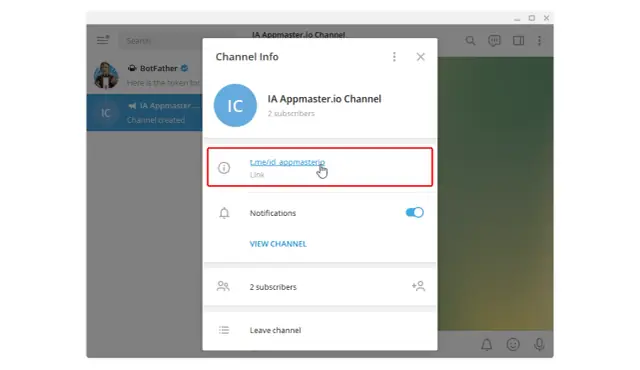
The channel address is in the general information about it - Channel Info. To open a window with information, go to the settings or just click on the name of the channel.
Great, you are now ready to connect the bot to your application. Go to Appmaster Studio.
Configure Appmaster Studio
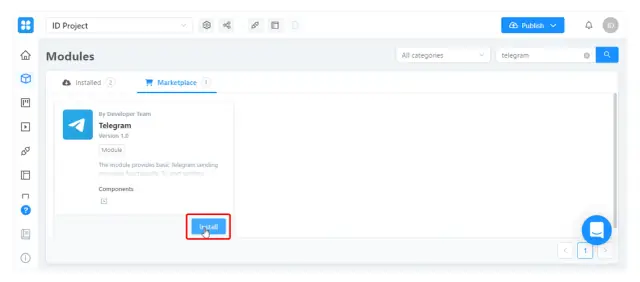
Install the Telegram module.
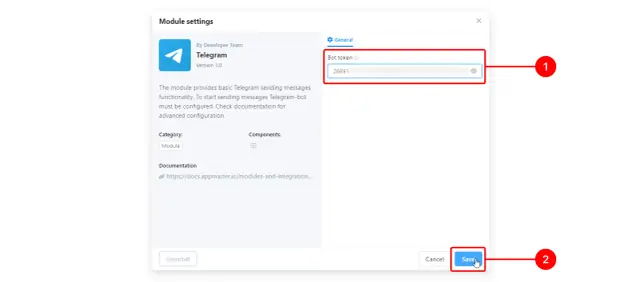
In the module settings, specify the token of your bot (1) and save the changes (2).
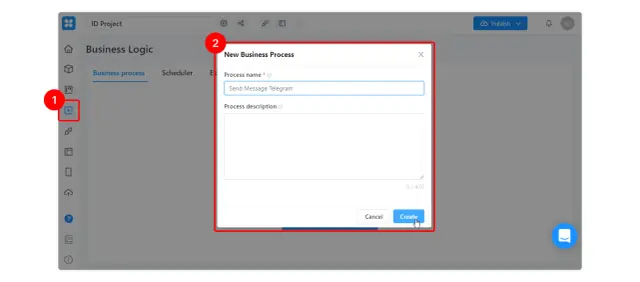
Go to the Business Logic designer (1) create a new business process (2).
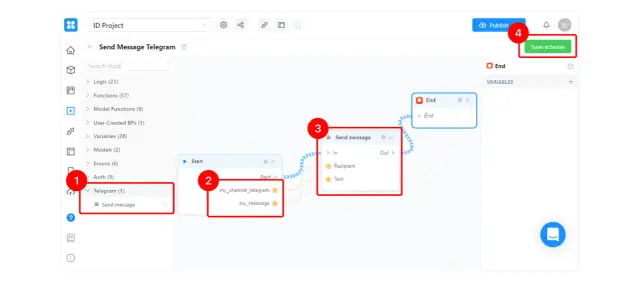
Include the Send Message block in the business process, which adds the Telegram module (1). Please note that in the Start block you need to create two variables of the string type (the first is the channel address, the second is the text of your message) and connect them to the variables of the Send Message(2,3) block. This is needed to create a form for sending a message. Don't forget to save the scheme (4).
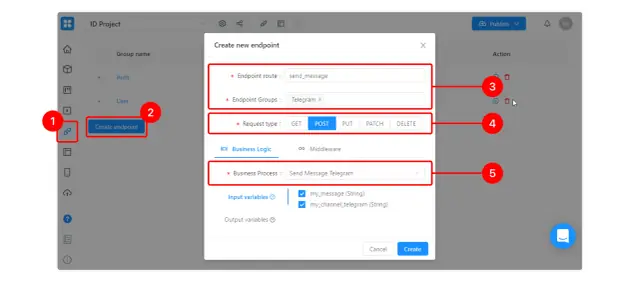
In the Endpoints tab (1) add a new endpoint (2). Enter the name and group in which it will be displayed (3). Set the request type to POST (4). In the Business Process field, select the business process you just created (5).
Read more about endpoints.
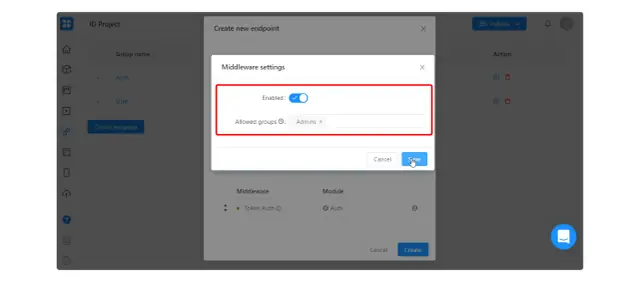
On the Middleware tab, you can allow only administrators to access the endpoint - so that regular users won’t be able to send messages through the bot.
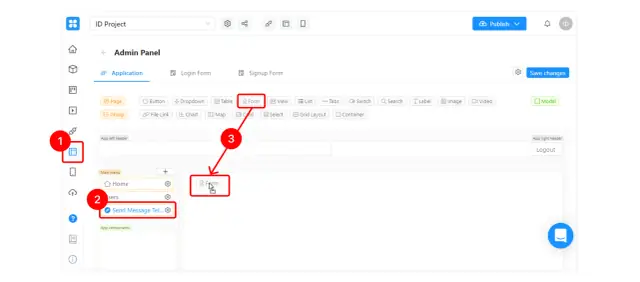
In the Web Apps designer (1), open your application and go to the page from which the users will send messages to Telegram (2). Create a form in it to send a message by dragging the Form element to the selected area of the page (3).
More information about the Web Apps Designer can be found here.
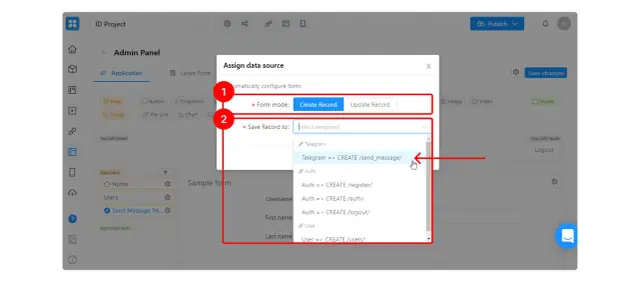
While creating the form, select the Create Record type (1) and the endpoint you created (2).
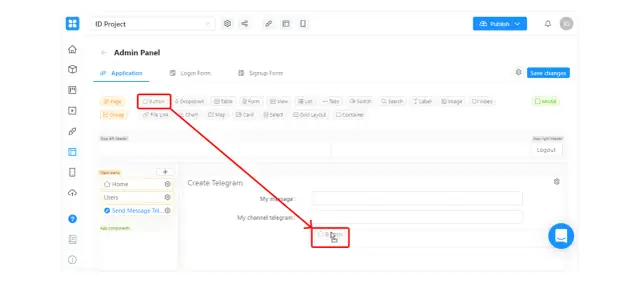
Add a button to send messages to the field below the form.
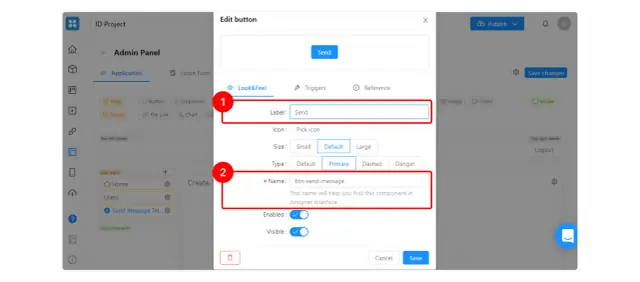
Enter the name that will be displayed on the button (1) and a unique name by which you will search for it in the settings (2). Change its design if desired.
On the Triggers tab (1) add an action for the onClick trigger - on click (2).
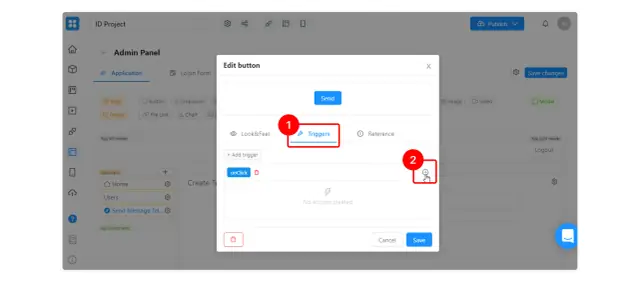
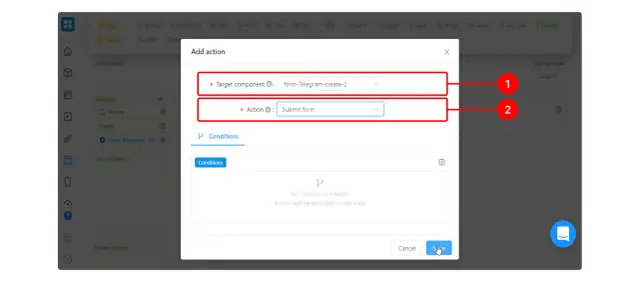
The settings window will open up. Specify in the Target component field the form you created (1) and select the Submit form(2) action for it.
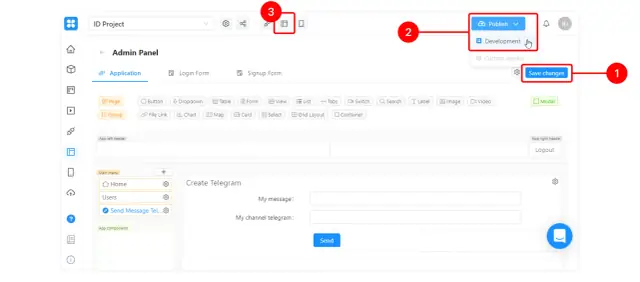
Now save all changes (1) and publish the project (2). Click on the button to go to the published web application (3).
If you have set a restriction for sending messages only for users of the Admins group, you will need to log into the application with an administrator account.
Open the bot sending page, enter your message text and the name of your channel.

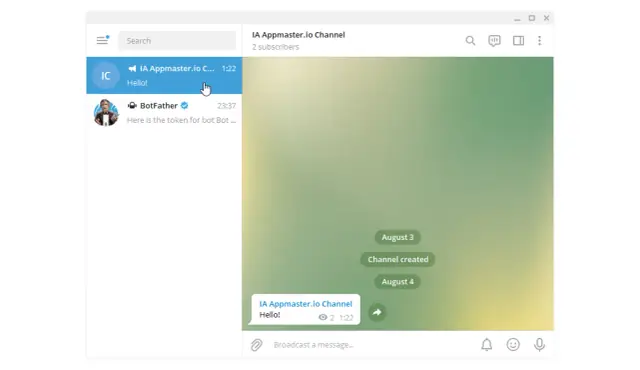
Make sure everything works - your message should appear in Telegram.
Write to the chat of our community if you have any questions - we will be happy to answer them!
Subscribe to us in messengers and social networks so as not to miss important and interesting things!
- News and updates - in the Appmaster.io telegram channel, on Facebook and LinkedIn.
- Check out our blog for step-by-step instructions, tutorials, and ideas for building apps.
- We now have video instructions for you here.


