How to Build Custom ChatGPT with OpenAI's GPT Builder
Learn how to create a customized ChatGPT with OpenAI's GPT Builder for tailored conversational AI experiences. We'll guide you through the steps, from selecting the dataset to fine-tuning the model.

ChatGPT, derived from OpenAI's powerful GPT (Generative Pretrained Transformer) family, is a state-of-the-art conversational AI model capable of providing human-like responses to various questions and tasks. It has been extensively used in various applications, such as chatbots, customer support systems, and content generation, with its primary purpose being to engage in natural language interactions with users. With its remarkable performance in generating realistic and relevant text-based responses, ChatGPT has become an integral part of many modern AI systems.
To build a custom ChatGPT that caters to your specific project requirements, fine-tune the pre-trained model on a dataset that suits your domain of interest. This permits the model to learn the nuances of the target domain and generate responses that align more closely with your desired conversational AI experience.
Overview of OpenAI's GPT Builder
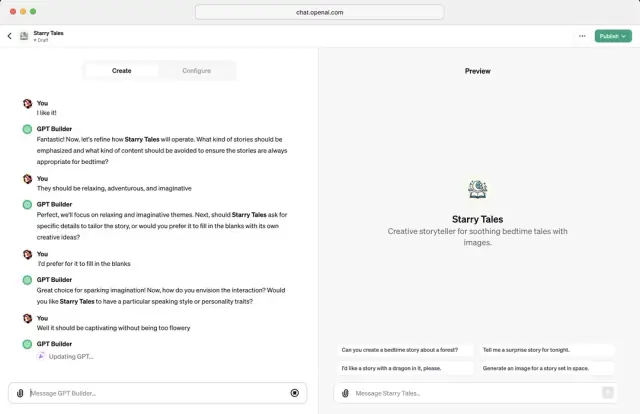
OpenAI's GPT Builder is a tool that allows you to create your own customized ChatGPT instances with a focus on your application's unique needs. By leveraging the powerful GPT model, GPT Builder helps you fine-tune the original model on a dataset of your choice, yielding optimized conversational AI experiences specifically tailored to your project.
GPT Builder streamlines the customizing ChatGPT models by providing an easy-to-use framework for dataset handling, model training, evaluation, and deployment. It allows you to experiment with configurations and perform necessary adjustments to achieve the desired output or balance model performance and resource constraints.

Image Source: The Verge
Setting Up the Development Environment
Before building your custom ChatGPT, it's crucial to set up a proper development environment. It will require specific hardware and software configurations to be in place:
Hardware Requirements
- A powerful computer with a multi-core processor and sufficient amount of RAM (32 GB minimum).
- An NVIDIA GPU with CUDA support and at least 12 GB VRAM for efficient model training and fine-tuning. Working with larger models may require more powerful GPUs or even multi-GPU setups.
Software Requirements
Install the following software components on your system:
- Python 3.7 or above. Make sure to install the appropriate version for your operating system.
- An installation of the TensorFlow library (version 2.x) with GPU support. TensorFlow is a popular open-source machine learning library that provides a comprehensive ecosystem for working with GPT-based models.
- OpenAI library. This Python package allows you to access and utilize OpenAI's GPT models and APIs conveniently and straightforwardly.
- Other required Python libraries, such as Numpy, Pandas, and requests, that are necessary for data manipulation, processing, and API calls.
Once your development environment is set up, you can start building your custom ChatGPT instance using OpenAI's GPT Builder. In the upcoming sections, we'll walk you through the steps required to select and prepare the dataset, build and fine-tune the model, test and evaluate its performance, and deploy it for practical applications.
Selecting and Preparing the Dataset
The success of your custom ChatGPT model heavily depends on the quality and diversity of the dataset used during the fine-tuning process. By selecting the right dataset, you can create a model that caters to your specific requirements and delivers the desired level of performance. Below are the steps to help you select and prepare the dataset for training your custom ChatGPT model.
Choose the Right Conversational Dataset
The first step is identifying a suitable conversational dataset that aligns with your project goals. There are several options when it comes to selecting the dataset:
- Pre-existing datasets: You can train your model using publicly available conversational datasets like the Cornell Movie Dialogs Corpus, Persona-Chat dataset, or Stanford Question Answering Dataset (SQuAD).
- Custom datasets: Alternatively, you can create a custom dataset that matches your domain or use-case. Consider collecting conversations from customer support chat logs, interviews, or any other context that fits your model's purpose. While creating such datasets, ensure the data is anonymized and properly consented to avoid privacy and ethical concerns.
- Combination of datasets: You can also combine standard and custom datasets to create a richer and more diverse set of conversations for training your model.
Clean and Preprocess the Dataset
Before feeding the dataset into your custom ChatGPT model, it is vital to clean and preprocess the data. This process has several steps, including:
- Removing irrelevant content or noises such as advertisements or special characters.
- Correcting grammatical and spelling errors, which might confuse the model during training.
- Converting texts to lowercase to maintain uniformity.
- Tokenizing your dataset, converting it into a format understandable by the model (e.g., splitting sentences into words or subwords).
Format the Training Data
After cleaning and preprocessing, you need to format your dataset according to OpenAI's GPT Builder’s requirements. Typically, chat-based models require a conversation to be formatted as a sequence of alternating user statements and model responses. Each statement and response pair should be clearly labeled, and special tokens should be used to indicate the beginning and end of a sentence or conversation. For example, if your dataset contains a conversation between a user (U) and a model (M), you can format it like this: ``` { "dialog": [ {"role": "user, {"role": "assistant, {"role": "user, {"role": "assistant ] } ```
By selecting the right dataset, cleaning and preprocessing it, and formatting it according to the model's requirements, you can create a strong foundation for building a powerful and accurate custom ChatGPT model.
Building and Fine-Tuning Your Custom Model
Once you have prepared your dataset, the next step is to build and fine-tune your custom ChatGPT using OpenAI's GPT Builder. The following steps outline the process of model building and fine-tuning:
Initialize Your Model
Begin by initializing the GPT model with OpenAI's GPT Builder. You can choose between various GPT model sizes, such as GPT-3, GPT-2, or even a smaller GPT model, based on your performance and resource requirements.
Load the Pre-trained Model Weights
Load the pre-trained model weights from OpenAI's GPT model. These weights have been trained on billions of text inputs and are a strong starting point for your custom model.
Prepare the Training Setup
Before fine-tuning your custom ChatGPT model, set up the training environment by specifying the necessary training parameters and hyperparameters, such as:
- Batch Size: The number of training examples used for each update of the model weights.
- Learning Rate: The step size used for optimizing the model weights.
- Number of Epochs: The number of times the training loop iterates through the entire dataset.
Fine-Tune Your Custom Model
With your training setup ready, fine-tune your custom ChatGPT model on your prepared dataset using GPT Builder. This process updates the model weights based on the patterns in your dataset, making your ChatGPT tailored to your specific use-case.
Iterate and Optimize
Fine-tuning your ChatGPT model is an iterative process. Monitor your model's performance metrics, such as perplexity or loss, and adjust your hyperparameters as needed. You may need to experiment with different learning rates and batch sizes or even preprocess your dataset differently to achieve better results.
By building and fine-tuning your custom ChatGPT model, you can create a conversational AI model that delivers domain-specific, highly relevant, and accurate responses to your users.
Testing and Evaluating the Model
After building and fine-tuning your custom ChatGPT model, testing and evaluating its performance is crucial. This ensures that the model delivers high-quality responses and aligns with your project's goals. Here are some steps you can follow to test and evaluate your model:
Use Evaluation Metrics
Quantitative evaluation metrics, such as BLEU, ROUGE, or METEOR, can be used to assess the quality of your model's generated responses. These metrics compare the similarity between your model's responses and human-generated reference responses. While these metrics are helpful to gauge the performance of your model, they may not always capture the nuances and contextual relevance of the responses.
Conduct Real-world Testing
Deploying your custom ChatGPT model within a controlled environment can provide valuable insights into its real-world performance. Interact with the model, pose various questions, statements, or scenarios, and analyze its responses' quality, relevance, and accuracy.
Perform Manual Evaluations
Sometimes, manual evaluation by domain experts or target users can offer valuable insights into the model's performance. These evaluations can help you uncover any discrepancies that automated metrics may have missed. It can also shed light on areas that need further improvement or refinement.
Iterate and Optimize
Based on the feedback and results gathered during the testing and evaluation phase, iterate on your custom ChatGPT model by adjusting your training setup, dataset, or training parameters as needed. Remember that creating a high-performing custom ChatGPT model requires continuous iterations and optimizations.
By thoroughly testing, evaluating, and refining your model, you can ensure that it closely aligns with your requirements and delivers an exceptional conversational experience to your users. And if you plan on integrating your custom ChatGPT into your software solutions, platforms like AppMaster make it easy to do so through their no-code, user-friendly interfaces.
Deploying the Custom ChatGPT
After building and fine-tuning your custom ChatGPT model, it's essential to deploy it effectively so it can be accessed and interacted with by users. Follow these steps to deploy your custom ChatGPT model:
- Choose a hosting environment: You can host your model on a local server or in the cloud using services like Google Cloud Platform (GCP), Amazon Web Services (AWS), or Microsoft Azure. Consider your project's requirements, scalability needs, and budget when selecting your hosting environment.
- Configure the server: Create and configure the server environment to run your custom ChatGPT. This often involves installing necessary software dependencies, setting up the server with proper configurations, and securing the server with authentication and encryption mechanisms.
- Upload the model: Transfer your custom ChatGPT model to your chosen hosting environment, either over a secured file transfer protocol (SFTP) or using the cloud provider's object storage service (e.g., Google Cloud Storage, Amazon S3, or Azure Blob Storage).
- Expose the model via API: Create an API to handle users' requests and retrieve responses from the model. This can be achieved through standard frameworks like FastAPI, Django, or Flask for Python-based applications. Test the API's functionality before proceeding to ensure proper integration.
- Monitor performance: Regularly monitor your model's performance, resource usage, and uptime through server monitoring tools and custom scripts. Set up alerts to notify you in case of issues like excessive resource consumption, service outages, or anomalies in the model's behavior.
- Maintenance and updates: Ensure that your server environment and model implementations are up to date by periodically updating software dependencies, security patches, and regularly optimizing the custom ChatGPT model based on user feedback and performance data.
Integrating the Model with External Applications
Once your custom ChatGPT is deployed and accessible via an API, you can integrate it with external applications, such as chatbots, customer support systems, or content management platforms. Here are a few tips on integrating your custom ChatGPT into external applications:
- Utilize existing plugin architectures: Many external applications provide plugin capabilities to extend their functionality. Develop custom plugins for these platforms that interact with your custom ChatGPT's API to offer seamless integration with minimal modifications to the existing system.
- Integrate with chatbot frameworks: Implement your custom ChatGPT model within popular chatbot frameworks, such as Microsoft Bot Framework, Dialogflow, or Rasa, by using their native APIs or building custom integrations. This will allow the chatbot to leverage the capabilities of your custom ChatGPT model.
- Connect to CRMs and customer support systems: Integrate your custom ChatGPT model with customer relationship management (CRM) systems and customer support platforms like Zendesk or Salesforce, using their APIs or custom connectors, to enable advanced conversational AI features, like case handling and ticket resolutions.
- Go beyond text-based interactions: Amplify the capabilities of your custom ChatGPT by connecting it with voice-based platforms, like Amazon Alexa or Google Assistant, and using speech-to-text and text-to-speech functionality to enable voice interactions with users.
- Integrate with AppMaster: Using AppMaster's no-code platform, you can seamlessly integrate your custom ChatGPT model with applications built on the platform for streamlined implementation of conversational AI in your software solutions. This streamlines incorporating chat interfaces and interactive elements within your apps.

Optimizing Your Model for Better Performance
Continuous optimization is essential to get the most out of your custom ChatGPT model. Use these strategies to optimize your custom ChatGPT model for better performance:
- Monitor user feedback: Pay close attention to user feedback and responses generated from your custom ChatGPT model. Identify areas where your model may require improvements, and use this information to guide further fine-tuning on your dataset.
- Adjust hyperparameters: Experiment with altering hyperparameters, such as learning rate, batch size, and the number of training epochs, to find the optimal configuration for your custom ChatGPT model. Fine-tuning hyperparameters can lead to improved performance and efficiency of your model.
- Implement model pruning: Reduce the size and complexity of your custom ChatGPT model by pruning unnecessary connections and parameters (weights) within the model's architecture. This can reduce the computational cost and resource usage while maintaining high-quality performance and output.
- Utilize quantization: Quantization techniques can further optimize your model by reducing the precision of weights and activations in the model without significantly compromising performance. This may improve performance, lower latency, and reduced resource consumption.
- Perform real-world testing: Test your model with real-world data and scenarios to uncover new optimizations and improvements. This ensures that your custom ChatGPT model remains up-to-date and attains the desired level of accuracy and reliability.
By following these guidelines, you can further enhance the performance and capabilities of your custom ChatGPT model, ensuring that it reliably meets the needs of your users and applications.
Conclusion and Next Steps
In this guide, we have provided an overview of building your own custom ChatGPT with OpenAI's GPT Builder. By creating a tailored conversational AI model, you can achieve improved performance and a more accurate understanding of your specific use case. As a next step, you should familiarize yourself with essential topics such as machine learning, natural language processing, and model evaluation to gain an in-depth understanding of the underlying concepts. Continuously iterate and improve your custom ChatGPT to maximize its effectiveness and fine-tune its capabilities to better serve your project requirements.
In addition, consider exploring other conversational AI models and framework alternatives to gain a broader perspective on the available technologies in the field. Engage with the open-source community to learn from their experiences and leverage their knowledge in fine-tuning and optimizing your custom ChatGPT.
Finally, consider utilizing platforms like AppMaster, a powerful no-code tool for creating web, mobile, and backend applications, to seamlessly integrate your custom ChatGPT into your projects. This will allow you to leverage the power of conversational AI into various aspects of your software solutions, delivering an improved user experience and optimizing your application's performance.
With the right approach and the willingness to experiment, you can create a powerful custom ChatGPT that serves your unique needs and helps your project stand out in the ever-evolving world of AI and technology.
FAQ
ChatGPT is a conversational AI model that can engage in natural language interactions with users, providing human-like responses to questions, participating in discussions, and solving various tasks.
OpenAI's GPT Builder allows you to create custom-tailored ChatGPT instances by fine-tuning the original GPT model on your specific dataset, offering optimized conversational AI experiences that better suit your project's requirements.
To set up your development environment for working with GPT Builder, you'll need a powerful computer, an NVIDIA GPU, and the necessary software, such as Python, TensorFlow, and OpenAI library.
Selecting the right dataset is crucial for building a custom ChatGPT. You can use pre-existing conversational datasets or create your own. Make sure to clean, preprocess, and format the dataset properly before training the model.
Fine-tuning your custom ChatGPT model involves training the model on your dataset, adjusting hyperparameters, and iterating through this process until the desired performance is achieved.
To test and evaluate your custom ChatGPT, you can use various metrics such as BLEU, ROUGE, or METEOR, and conduct real-world testing through user interactions and manual evaluations.
Yes, you can integrate your custom ChatGPT with external applications through APIs or custom-built plugins, enabling seamless collaboration between the ChatGPT and other systems.
Optimizing your custom ChatGPT involves fine-tuning the model, adjusting hyperparameters, optimizing response generation, and further customization based on your project's specific requirements.
AppMaster's no-code platform allows seamless integration of custom ChatGPT models with applications built on the platform, providing a streamlined way of implementing conversational AI in your software solutions.


