Grow with AppMaster Grow with AppMaster.
Become our partner arrow ico

How to Create Your First App with a Free App Builder Without Coding

How to Create Your First App with a Free App Builder Without Coding

The advent of no-code app building has democratized the app development process, making it accessible to individuals and businesses with little to no coding experience. No-code app builders enable users to create complete web and mobile applications using drag-and-drop interfaces, visual editors, and pre-built components. They are designed to simplify and streamline the app development process, reducing the time, effort, and resources required to bring a project to life.

No-code app builders have gained popularity in recent years, as they empower users to innovate and build useful applications without the need for technical expertise. They also promote cross-functional collaboration, as teams can work together effectively to bring their ideas to life regardless of their skill level.

Choosing a Free App Builder

There are several key factors to consider when looking for a free app builder. The ideal no-code platform should provide a comprehensive set of features, be user-friendly, and cater to the specific needs of your project. Here are a few factors to remember when choosing a free app builder:

  • Features: Ensure the app builder offers a robust set of core features, such as visual design, database management, API integration, and deployment options. Additionally, the platform should be scalable and flexible to accommodate more complex projects and requirements.
  • Ease of use: Choose an app builder with a user-friendly interface and interactive tutorials to get you started. Look for a platform with a gentle learning curve, so you can quickly become proficient in its use.
  • Community and support: A strong community and support system is crucial when working with an app builder. Ensure the platform has an active community of users, comprehensive documentation, and responsive customer support to help you when you encounter difficulties.
  • Integration options: Your app builder should offer seamless integration capabilities with third-party services and APIs. This will allow you to easily extend your app’s functionality and connect with other tools and data sources.
  • Deployment and hosting: Look for an app builder that provides convenient and secure deployment options, such as one-click publishing and automatic updates.
  • Pricing: Although you may start with a free plan, consider the costs and benefits of paid plans as your project grows. Ensure the platform offers a variety of pricing options that cater to different levels of complexity and resources.

Getting Started with AppMaster's Free Plan

AppMaster is a powerful no-code tool for creating backend, web, and mobile applications without writing code. With over 60,000 users and multiple G2 High Performer and Momentum Leader awards, it has become a popular choice among both beginners and professionals. AppMaster's free "Learn & Explore" plan is designed to help you dive into the platform and learn its features without any financial commitment. Here's a step-by-step guide to getting started with AppMaster's free plan:

  1. Create an account: Sign up for a free account. You'll have access to the platform’s core features on the "Learn & Explore" plan.
  2. Explore the AppMaster Studio: The AppMaster Studio is a comprehensive integrated development environment (IDE) designed to facilitate app-building. Take some time to familiarize yourself with the layout and various app-building components. You can find tutorials and resources in the platform's documentation to help you get situated.
  3. Create a new project: Start a new project by clicking on the "Create Project" button. Choose between creating a backend, web, or mobile application project. Selecting any of these options will prompt you to provide a name for your project and configure your project settings.
  4. Navigate the database schema: AppMaster allows you to visually create data models (database schema) via the Database Designer. Learn how to create tables, define relationships, and manage database entries with ease using the platform's intuitive interface.

AppMaster signup

The next sections will cover designing your app, adding functionality, integrating APIs, testing, and deploying your app using AppMaster. Stay tuned to learn how to create your first app without writing any code using this powerful no-code platform.

Designing Your App

The first step in creating your app with a free app builder is designing the visual appearance and user interface. Designing an app involves determining the layout of the screens, the user flow, and the elements it should contain, such as buttons, menus, forms, and images. Here's a step-by-step process for designing your app:

  1. Choose a template or start from scratch: Most app builders, including AppMaster, offer pre-built templates to help jumpstart your app design. These templates cover various categories and use cases, such as e-commerce, blogging, project management, etc. You can choose a template that suits your needs or start with a blank canvas.
  2. Create a wireframe for your app: A wireframe is a visual representation of the structure and layout of your app. It helps you plan how users will interact with your app and how elements will be arranged on each screen. Sketch your wireframes on paper or use a digital tool to create a blueprint of your app, including the placement of text, buttons, images, and menus.
  3. Use the app builder's drag-and-drop editor: Once you have your wireframes ready, use the app builder's visual drag-and-drop editor to replicate your designs onto the platform. Most no-code app builders, including AppMaster, offer a vast library of UI components, such as forms, buttons, sliders, and images, that you can easily drag onto your canvas and arrange as needed.
  4. Customize the appearance: After placing your UI components, customize their appearance by adjusting colors, fonts, and styles to match your app's identity and create a consistent user experience across your app. Most app builders offer various styling options and even let you edit CSS directly if needed.
  5. Design for different device sizes: Make sure your app looks and works well on different screen sizes and orientations. App builders usually provide responsive design features and options to adjust layouts and element arrangements for various devices easily.
Try AppMaster no-code today!
Platform can build any web, mobile or backend application 10x faster and 3x cheaper
Start Free

Following these steps will create an engaging and user-friendly interface for your app.

Adding Functionality to Your App

After designing the look and feel of your app, it's time to add functionality. No-code app builders allow you to create various features without writing any code using visual tools and pre-built components. Here's how to add functionality to your app:

  1. Identify the necessary features: List the features your app needs to fulfill its purpose while keeping the interface intuitive. These features can include user authentication, data storage, notifications, etc.
  2. Explore pre-built components: Most app builders offer a range of pre-built components that can be easily added to your app to provide essential functionality. For example, AppMaster provides built-in components for user management, data handling, and navigation menus.
  3. Add and configure components: To add a component to your app, simply drag it onto your canvas, position it accordingly, and configure its properties. Many components have customization options to adapt their behavior and appearance to your app's requirements.
  4. Create custom logic: If your app requires specific functionality not covered by pre-built components, you can create custom logic. AppMaster's Business Process (BP) Designer lets you define custom behavior for your app by visually designing business processes and workflows without writing code.
  5. Link screens and navigation: Finally, connect the different parts of your app by defining navigation flows. This can be as simple as linking buttons to specific screens or as complex as implementing multi-step processes and conditional navigation.

By following these steps, you'll create an app that's visually appealing, fully functional, and interactive.

Integrating APIs

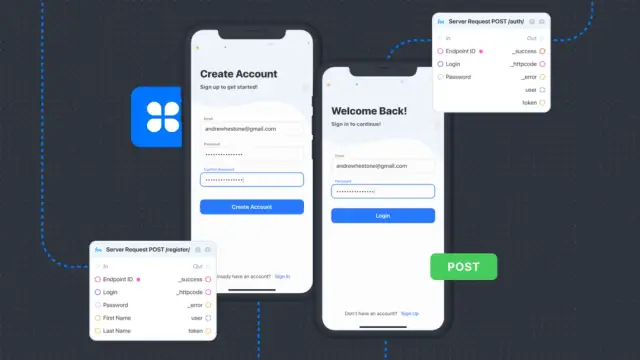
APIs (Application Programming Interfaces) are crucial in modern app development, enabling apps to interact with external data and services. No-code app builders, like AppMaster, make it easy to integrate APIs into your app without writing any code.

Here's a step-by-step guide for integrating APIs into your app:

  1. Identify the APIs you need: Start by determining which APIs you want to include in your app. Some common use cases include integrating social media, location services, payment gateways, and weather data.
  2. Obtain API keys and credentials: Most APIs require an API key or other credentials to access their services. To obtain your API credentials, sign up for an account with the provider and follow their registration process. API documentation should provide you with the necessary details on obtaining and managing API keys.
  3. Add the API to your app builder: Once you have your API keys, add the API to your app builder. In AppMaster, this can be done by creating a new API Call component with the appropriate settings and parameters. Configure the API Call component with the necessary headers, method, and URL as outlined in the API documentation.
  4. Configure the API request and response: Set up the API request parameters, which may include dynamic values based on user input or data stored in the app. Parse the API response to extract the relevant information and display it in your app or use it as part of your app's logic.
  5. Test the API integration: Obtain a sample response from the API and simulate it in your app builder to verify that your app performs the expected actions and displays data correctly. Thoroughly test the integration to ensure your app works seamlessly with the API's services.
Try AppMaster no-code today!
Platform can build any web, mobile or backend application 10x faster and 3x cheaper
Start Free

API integration is a powerful way to enhance your app's functionality by leveraging data and services from external platforms. Following this guide, you can integrate APIs smoothly into your app, enhancing its capabilities and user experience.

Testing Your App

Testing your app is a critical step before deploying it to your users. This stage helps you identify bugs, evaluate the app's usability, and make necessary adjustments to create a seamless user experience. With a free app builder like AppMaster, you can access built-in preview and testing tools. Follow the steps below to test your app efficiently:

  1. Start with the built-in preview tools: AppMaster and other no-code platforms offer live previews of your app, allowing you to see the changes in real-time as you edit. Use this feature to interact with your app and ensure it behaves as expected.
  2. Perform usability testing: Usability testing focuses on evaluating your app from a user's perspective. It ensures that your application's UI and UX are intuitive and efficient. You can gather feedback from your friends, family, or colleagues representing potential users and incorporate their suggestions to improve the app's usability.
  3. Test on multiple devices and platforms: Ensure your app works well on different devices (smartphones, tablets) and platforms (iOS, Android). AppMaster generates applications that are compatible with multiple platforms, making this step easier for you.
  4. Perform functionality testing: Go through every feature, component, and interaction in your app to ensure they work as intended. Functionality testing checks whether your backend processes are running correctly and whether your app's API integrations function as they should.
  5. Test for performance and scalability: Check how your app performs under various load conditions, as performance issues can affect the user experience. AppMaster's generated applications have high scalability, ensuring your app can handle increased workloads.

Take your time during the testing phase and address any issues that arise. Thorough testing ensures that your app delivers a satisfying user experience and meets your defined functional requirements.

Deploying Your App

Now that you have designed, developed, tested, and refined your app, it's time to deploy it. Depending on the free app builder you use, the deployment process may vary, but with AppMaster, the process is as follows:

  1. Publish your app: After thoroughly testing your app, click the 'Publish' button on the AppMaster platform. When you do this, the platform generates the source code for your applications, compiles them, runs tests, and packs them into Docker containers (for backend applications).
  2. Deploy to the cloud: Once the compilation and packaging processes are completed, AppMaster automatically deploys your backend applications to the cloud. Your web and mobile applications are now accessible to your users.
  3. Monitor and update your app: After deployment, monitor your app's usage, gather user feedback, and track potential issues. Use this information to make necessary updates and improvements to your app. With AppMaster, updating your app merely requires making changes within the platform and hitting the 'Publish' button again to regenerate and recompile the application without incurring any technical debt.

Deployment is the final stage of the app creation process, but it's essential to continue refining your app based on user feedback and analytics to ensure a successful, long-lasting application.

Conclusion

Creating your first app with a free builder without coding is rewarding and achievable. By leveraging powerful no-code platforms like AppMaster, you can transform your idea into a fully-functional application in no time. AppMaster offers a comprehensive, easy-to-use platform to create backend, web, and mobile applications without writing a single line of code.

This guide covered how to choose a free app builder, get started with AppMaster's free plan, design your app, add functionality through components and API integrations, and test and deploy your application. By following these steps, you'll pave the way to launching an app that delivers value to its users and empowers you to bring your vision to life.

What features are available in the free plan of AppMaster?

AppMaster's free "Learn & Explore" plan allows you to explore the platform and learn its features at no cost. This plan is optimal for new users and is useful for getting started with the platform before committing to a paid tier.

How do I test my app created using a free app builder?

Most app builders, including AppMaster, provide built-in preview and testing tools to help you evaluate your app's functionality, UI, and performance. You can test your app and make adjustments before deploying it to the final users.

Do I need any coding skills to use a free app builder?

No, free app builders are designed for users with little to no coding skills. You can use their visual interfaces and pre-built components to create your app without writing any code.

Can I use an app builder like AppMaster to create complex applications?

Yes, AppMaster's robust platform allows you to create comprehensive, enterprise-grade solutions with its advanced features and scalability, making it suitable for developing complex applications, even without prior programming experience.

How can a free app builder help me create my first app?

A free app builder provides you with tools to create an app from scratch, design and prototype your project with ease, and explore various functionalities available in the platform. They usually offer interactive tutorials and resources to get you started.

How does AppMaster help in creating apps without coding?

AppMaster is a powerful no-code platform that enables you to create backend, web, and mobile applications using a visual interface. It offers a comprehensive set of features, including data models, business processes, REST APIs, UI design, and more, without requiring any coding skills.

How do I deploy my app created with a free app builder?

App builders usually offer deployment options within their platform. For instance, AppMaster generates source code, compiles applications, and automatically deploys your app to the cloud once you're ready to publish.

What is a no-code app builder?

A no-code app builder is a platform that allows users to create complete web and mobile applications without writing any code using drag-and-drop interfaces, visual editors, and pre-built components.

Related Posts

The 10 Leading AI Tools That Can Boost Your Income
Discover the top 10 AI tools that can significantly enhance your income. From automation to analytics, learn how these tools can help you excel in your business.
Top Ecommerce Tools for Boosting Sales in 2024
Explore the top ecommerce tools of 2024 to enhance sales and streamline online store management. Discover SEO, analytics, and conversion optimization tools.
Top 5 Project Management Tools Simplified
Explore the top 5 project management tools that can simplify your workflow. Understand their key features, benefits, and how they compare to streamline your project management needs.
GET STARTED FREE
Inspired to try this yourself?

The best way to understand the power of AppMaster is to see it for yourself. Make your own application in minutes with free subscription

Bring Your Ideas to Life