


Equipment reservation app: prevent conflicts and track returns
Plan an equipment reservation app that prevents double bookings, records returns and damage, and places faulty items on maintenance hold.
Learn how to create powerful command-line applications using Go, a modern and efficient programming language, with essential tips, techniques, and best practices to streamline your development process.

Go, also known as Golang, is an open-source programming language designed by Google. It emphasizes simplicity, safety, and performance, making it an excellent choice for building command-line interface (CLI) applications. CLI applications are tools that users can interact with through a text-based interface, commonly used for system administration, automation, and scripting tasks. Go is well-suited for CLI development because it offers:
In this article, you'll learn the essentials of developing CLI applications using Go—from setting up your environment and structuring your application to handling command-line arguments and leveraging third-party packages.
Before you can start writing CLI applications with Go, you must first install the Go programming language on your system.
go version in your terminal. This command should display the installed Go version.GOPATH, which determines the location of your Go workspace (where your Go projects and dependencies will be stored), and GOROOT, which points to your Go installation directory.go command is in your system's PATH variable. This allows you to execute Go commands from any directory.With Go installed and your environment configured, you're ready to start building your first CLI application.
Properly structuring your CLI application is essential to maintainability and scalability, ensuring that your code is organized and easy to navigate. In Go, code organization is achieved through packages and modules.
Packages: Packages are Go's way of organizing and compartmentalizing code. A package consists of one or more source files (with a .go extension) located in the same directory. Each file in a package must declare its package name, specified with the package keyword at the start of the file. A typical Go CLI application has at least two packages:
main: This is the default package for the entry point of your application. It is where the main() function resides and serves as the starting point for your CLI application. All CLI-specific logic and commands should be placed inside the main package.internal or pkg: These packages contain reusable code that is separated from your CLI logic. You can use internal for code that should only be imported by your own Go code within the project, and pkg for code that can be imported by any Go project.Modules: Modules are a means of managing dependencies and versioning in Go applications. Introduced in Go 1.11, they allow developers to declare package dependencies and specify the required version. To create a new Go module, navigate to your project's root directory and execute the following command:
go mod init your.module.name
This command creates a go.mod file in the root directory, which lists your project's dependencies, and a go.sum file, which holds the checksums of each dependency. When you import packages or use third-party libraries, Go will automatically keep track of the dependencies in the go.mod and go.sum files.
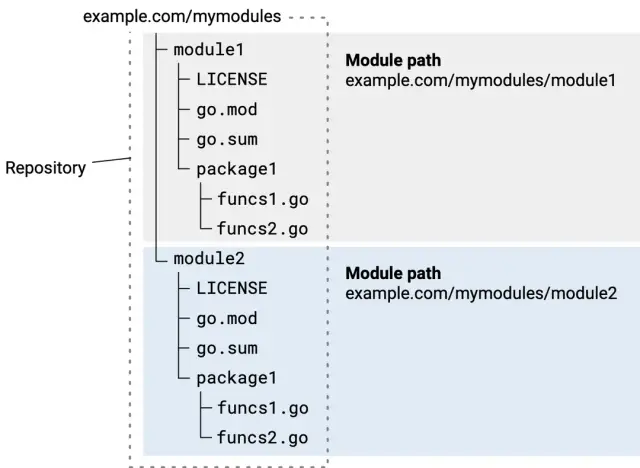
Image source: The Go Programming Language
By using packages and modules effectively, you can maintain a clean and efficient code structure for your Go CLI application, making it more straightforward to develop, debug, and extend your project in the future.
Command-line arguments and flags are essential components of CLI applications, allowing users to control the application's behavior and provide necessary input. In Go, you can work with command-line arguments and flags using the standard library's flag and os.Args packages.
The os.Args package provides direct access to the command-line arguments. It is a slice of strings, where os.Args[0] is the name of the running program, and the rest of the entries represent the arguments passed to the program.
Here's an example of using os.Args:
package main

import (
	"fmt"
	"os"
)

func main() {
	argCount := len(os.Args)
	fmt.Printf("Number of arguments: %d\n", argCount)
	fmt.Println("Arguments:", os.Args)
}
By running the program, you'll see the number and the list of provided arguments.
The flag package is a more sophisticated and flexible way of working with command-line flags. It enables you to define flags with various data types and parse the input conveniently.
Below is an example of using the flag package:
package main

import (
	"flag"
	"fmt"
)

func main() {
	var (
		name   string
		age    int
		height float64
	)

	flag.StringVar(&name, "name", "John Doe", "Your name")
	flag.IntVar(&age, "age", 21, "Your age")
	flag.Float64Var(&height, "height", 180.0, "Your height (in cm)")

	flag.Parse()

	fmt.Printf("Name: %s\n", name)
	fmt.Printf("Age: %d\n", age)
	fmt.Printf("Height: %.1f\n", height)
}
Once you define the flags, you'll invoke flag.Parse() to parse the provided command-line input and populate the defined variables. You can then use these variables throughout your application.
For complex CLI applications, you might want to create commands and subcommands to organize your functionalities and options better. One popular third-party package for working with commands and subcommands in Go is github.com/spf13/cobra.
To begin, you'll need to install the Cobra package:
go get -u github.com/spf13/cobra/cobra
Once installed, you can create a new CLI application with Cobra:
cobra init my-cli --pkg-name=my-cli
This command creates a new directory named my-cli with the necessary structure and files for a Cobra-based CLI application.
In a Cobra-based application, you create commands by defining instances of cobra.Command. Each command has a Use field (indicating how the command is used), a Short field (providing a short description), and a Long field (providing a more detailed description).
Moreover, each command should have a Run field, containing a function that executes the command's logic. You'll often define this function as a closure to capture the command's flags and arguments.
Here's an example of creating a simple "greet" command:
greetCmd := &cobra.Command{
	Use:   "greet",
	Short: "Greet someone",
	Long:  "This command greets someone with a customizable message.",
	Run: func(cmd *cobra.Command, args []string) {
		// Logic for the greet command
	},
}
To create a subcommand, you can define another cobra.Command instance and add it as a child of the parent command using the AddCommand method. For instance, you can create a "goodbye" subcommand under the "greet" command:
goodbyeCmd := &cobra.Command{
	Use:   "goodbye",
	Short: "Say goodbye to someone",
	Long:  "This subcommand says goodbye to someone in a specific language.",
	Run: func(cmd *cobra.Command, args []string) {
		// Logic for the goodbye subcommand
	},
}
greetCmd.AddCommand(goodbyeCmd)
Interactive prompts can improve your CLI application's user experience by guiding users through a series of questions and gathering input based on their responses. One popular third-party package for working with interactive prompts in Go is github.com/AlecAivazis/survey/v2.
First, you need to install the Survey package:
go get -u github.com/AlecAivazis/survey/v2
Survey provides a set of predefined prompt types, including Input, Select, MultiSelect, Confirm, and more. To create a prompt, you instantiate the desired prompt type and call the survey.Ask function.
package main

import (
	"fmt"
	"github.com/AlecAivazis/survey/v2"
)

func main() {
	var name string
	namePrompt := &survey.Input{
		Message: "What's your name?",
	}
	err := survey.Ask([]*survey.Question{{
		Name:    "name",
		Prompt:  namePrompt,
		Validate: survey.Required,
	}}, &name)
	if err != nil {
		fmt.Println("Error:", err)
		return
	}
	fmt.Printf("Hello, %s!\n", name)
}
This code snippet demonstrates the use of Survey's Input prompt to gather a name and display a greeting message. The Validate field can be set to implement custom validation logic for user input.
In many CLI applications, it's common to rely on external libraries to enhance functionality and streamline the development process. Go provides a modern and efficient approach to dependency management that enables developers to work with external libraries seamlessly. Introduced in Go 1.11, Go modules let you declare package dependencies within your project and automate the process of downloading, building, and installing the required packages. To manage external libraries in your CLI application, follow these steps:
go mod init <module-name>, replacing 'go.mod in your project directory.go.mod and go.sum files.go get -u followed by the package name. This updates the package to the latest version, reflecting the changes in your go.mod file.go.mod file, run the command go mod tidy. This removes any libraries that are no longer needed or have become obsolete during development.Using Go modules provides several advantages when working with external libraries. For instance, it promotes code readability and simplifies dependency management, allowing for a more maintainable and modular CLI application.
Proper error handling and logging are crucial to ensure the robustness of your CLI application. Go offers a highly practical and ergonomic approach for working with errors and logs. To handle errors in Go, you can use the standard errors package. Here are some best practices when working with errors in your CLI applications:
errors.New function or by implementing the error interface. Custom error types enable you to convey more specific information about what went wrong when an error occurs.For logging, the Go standard library offers the log package, which provides a simple and flexible logging interface. You can use the package to log messages with different severity levels and customize the output target. For more advanced logging capabilities, consider using structured logging with the popular github.com/sirupsen/logrus package. Here are some tips for effective logging in your CLI application:
Quality assurance is yet another vital aspect of developing reliable CLI applications. Go's built-in support for testing and benchmarking allows you to write effective unit tests and measure your CLI application's performance. Go's testing package enables you to write unit tests, run them in parallel, and generate test coverage reports. Use the following techniques to enhance your testing practices:
Test, like TestMyFunction. Place these functions in a separate _test.go file alongside the source file being tested.t.Parallel() function within your test functions to run tests concurrently. This can speed up the execution of your test suite, especially when dealing with resource-intensive tests.go test -cover command to generate code coverage reports. This helps you identify areas of your code that require more thorough testing and ensures a higher degree of test coverage.To measure the performance of your CLI application components, Go provides support for benchmarking through the same testing package. Use benchmarks as follows:
Benchmark, like BenchmarkMyFunction. Place these functions in the same _test.go file containing the relevant test functions.testing.B parameter: Run the code you want to benchmark within a loop controlled by the testing.B parameter (e.g., for i := 0; i < b.N; i++ { ... }). The testing.B parameter is automatically adjusted by the testing package to achieve a statistically significant measurement.go test -bench command to run your benchmarks and analyze the results. This can help you determine areas of your CLI application that need optimization and gauge the impact of performance improvements.In conclusion, proper management of external libraries, error handling, logging, testing, and benchmarking are vital for creating reliable, and efficient CLI applications. By leveraging the various tools, techniques, and best practices outlined in this article, you can ensure that your Go-based CLI application achieves a high level of quality and excellence. In addition, combining the power of Go with versatile platforms such as AppMaster can greatly expedite software development processes, thereby achieving outstanding results.
Once you have completed the development of your Command Line Interface (CLI) application in Go, the final step is to deploy and distribute it for users to access and utilize. The Go programming language and its build toolchain allow you to create standalone, statically linked executables that are easy to distribute and share across platforms.
To build your Go CLI application, use the go build command followed by the target package or file:
go build ./path/to/your/package
Or:
go build main.go
This command will build an executable binary file for your current platform (e.g., Windows, macOS, Linux) and place it in the current working directory. By default, the binary file's name matches the package's name or the source file's name without the extension (e.g., main).
However, you can specify output binary file names and target different platforms using the -o flag and environment variables:
GOOS=linux GOARCH=amd64 go build -o custom-name ./path/to/your/package
In the above example, we set the GOOS and GOARCH environment variables to instruct the Go build process to target Linux with an AMD64 architecture, and we set the output binary file name to custom-name.
Go simplifies cross-compilation, and you can quickly create executables for various platforms without complex build configurations. To cross-compile your Go CLI application for multiple platforms, set the GOOS and GOARCH environment variables accordingly. The following example demonstrates how to cross-compile a Go CLI application for Windows, macOS, and Linux:
# For Windows 64-bit
GOOS=windows GOARCH=amd64 go build -o mycli-windows.exe ./path/to/package

# For macOS 64-bit
GOOS=darwin GOARCH=amd64 go build -o mycli-macos ./path/to/package

# For Linux 64-bit
GOOS=linux GOARCH=amd64 go build -o mycli-linux ./path/to/package
You can distribute your Go CLI executable binary files by providing direct download options on your project's website or within README documentation. Alternatively, distribute as platform-specific packages using packaging systems, repositories, or package managers. Some popular package management systems include:
Creating powerful CLI applications with Go is an enjoyable and rewarding process. The simplicity, performance, and binary distribution advantages make Go an ideal programming language choice for this purpose. As you continue to develop your Go CLI applications, consider exploring additional resources to expand your knowledge and improve your skills:
Furthermore, consider exploring no-code platforms like AppMaster.io that use Go (golang) as their backend programming language. AppMaster.io provides an intuitive drag-and-drop interface that allows you to develop web, mobile, and backend applications without writing a single line of code. By understanding both Go and no-code platforms like AppMaster.io, you will be well-equipped to develop even more sophisticated software solutions in the future.
Go offers several benefits for CLI application development, including simplicity, strong performance, and excellent support for concurrency. The language is easy to learn and provides powerful tooling for building efficient and scalable applications.
You can easily install Go by downloading the appropriate binary package for your platform from the official Golang website. Follow their installation instructions, and make sure to set the necessary environment variables (e.g., GOPATH, GOROOT).
Go's standard library provides flag and os.Args packages to handle command-line arguments and flags. You can use the flag package to define and parse flags, while os.Args allows you to access command-line arguments directly.
For complex CLI applications, you can use third-party packages like github.com/spf13/cobra to create commands and subcommands. The Cobra package offers an intuitive API for working with commands and supports advanced features such as command-line completion and help documentation generation.
You can manage external libraries using Go modules, which were introduced in Go 1.11. Modules allow you to declare package dependencies and have the Go toolchain automatically download, build, and install the packages you need.
In Go, you can use the errors package to create and manage error instances. For logging, the standard library offers the log package, which supports different logging levels and customizable output targets. Consider using structured logging with packages like github.com/sirupsen/logrus for enhanced logging capabilities.
Go provides built-in testing and benchmarking support through the testing package, which allows you to write effective unit tests, run them in parallel, and measure the performance of your CLI application components.
To deploy and distribute your Go CLI application, you can build it using the go build command, which creates a single standalone binary file for your target platform. You can then make the binary available for download or distribute it via package management systems like Homebrew or APT.
While AppMaster.io is a no-code platform geared primarily towards web and mobile application development, the backend applications generated with AppMaster use Go (golang) as their programming language. This illustrates the versatility of Go and its applicability in various software development contexts.
Experiment with AppMaster with free plan.
When you will be ready you can choose the proper subscription.


