Task Scheduler in the backend of the AppMaster application, as in the classic case of the backend, creates repeating scenarios. For example, when you need to do a specific action on a schedule. A classic example of such tasks is an example of cleaning up temporary files on the server, weekly backups, generating reports according to a given algorithm, etc.
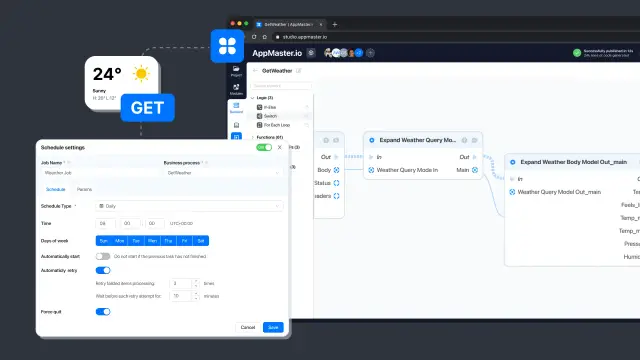
Let's consider an example of using the task scheduler in the AppMaster application backend. Suppose you want to build a process that every morning at 9.00 am will send the user the weather to his mobile phone number.
Thus, the task is divided into several logical stages:
- Installing and configuring the module for sending mobile messages
- Creating and configuring an external request API process
- Setting up a scheduler in the application backend
1. Installing and configuring the module for sending mobile messages.The Nexmo module allows you to integrate into the AppMaster application the ability to send SMS messages to a selected number.
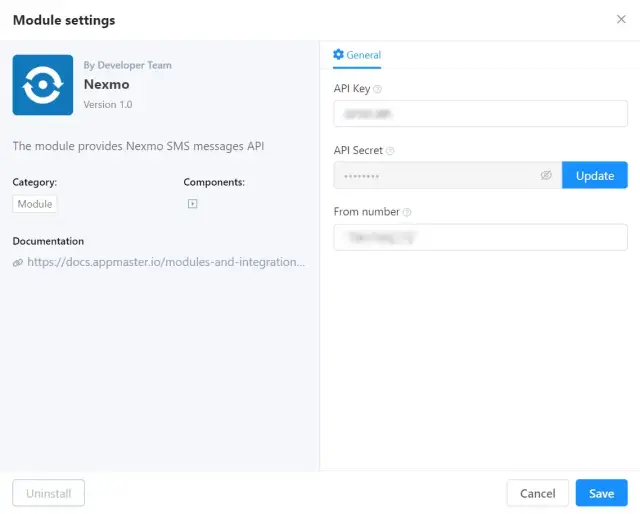
- API Key - API key that can be obtained in your Nexmo account ( https://dashboard.nexmo.com/settings);
- API Secret - a private key that is used in conjunction with the API key to identify the user. You can also get it in your Nexmo account ( https://dashboard.nexmo.com/settings);
- From number - number specified during registration in your Nexmo account.
The following business processes are installed automatically with the module installation:
- Nexmo.Send SMS - allows you to send messages to the specified number through the
Nexmo module:
- Phone[phone] - the phone number to which the message will be sent;
- Content [string] - text message;

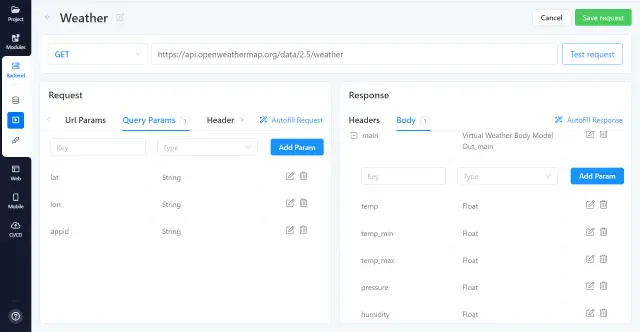
2. The free OpenWeather API web resource will be used as a weather data source ( https://openweathermap.org/api).The first step is to create an external request API template. API request templates are presented in the Business Process section of the External API Requests tab. To create a new template, click on Create API request.

Request type: GET
Request address: https://api.openweathermap.org/data/2.5/weather
Query Params:
- Lat [string] - latitude
- Lon [string] - longitude
- Appid [string] - OpenWeather API Key
As part of this task, we are only interested in a few fields of the response body in the main ( https://openweathermap.org/api/one-call-3).
- Temp [float] - temperature
- Temp_min [float] - min temperature
- Temp_max [float] - max temperature
- Pressure [float] - pressure
- Humidity [float] - humidity
3. Before setting up the task scheduler, you need to create a Business Process that will receive weather information via the API. The business Process looks as follows:
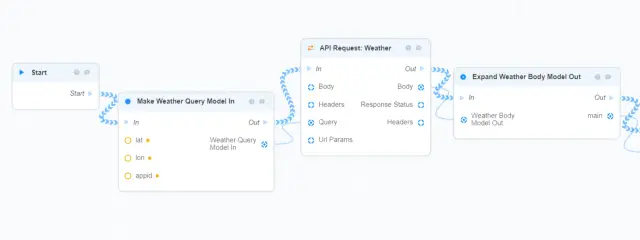
- Make Weather Query Model In - creates a virtual request parameter model. Lon, lat - coordinates of the desired location, appid - API key of the OpenWeather service;
- API Request: Weather - the business process responsible for interacting with OpenWeather API
- Expand Weather: Body Model Out - needed in order to deploy the Body response model
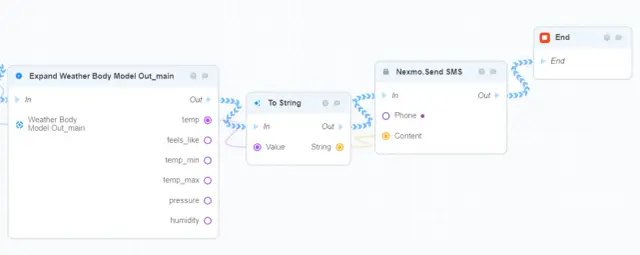
- Expand Weather: Body Model Out_main - expands the main model of the body of the request-response Body in order to get the temperature (temp).
- To String - converts temp field value into string type;
- Nexmo: Send SMS - sends a message with information about the temperature (Content) to the specified phone number (Phone)
Set up a scheduler in the business process section of the Scheduler tab.
Scheduler settings in the Schedule tab differ depending on their type.
Let's consider each of them in detail
1. Daily - allows configuring daily schedules
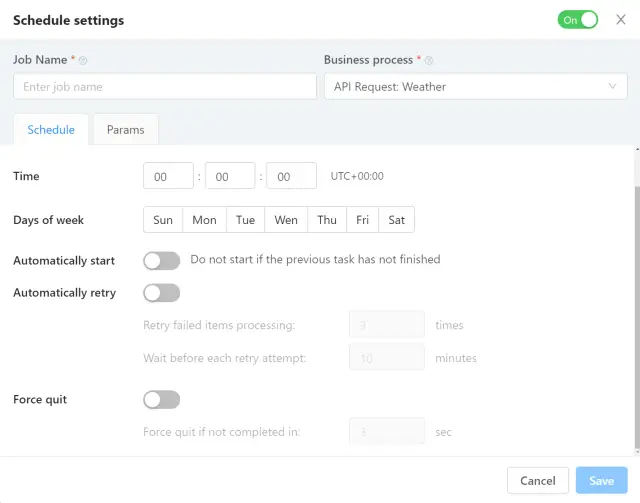
- Time - defines the time in UTC+0 at which the scheduler will start the selected BP;
- Days of the week - defines the days of the week for the scheduler to work;
- Automatically start - if set to True, a new BP will not start if the previous one has not been completed. Default value: False.
- Automatically retry - restarts the process automatically if it was interrupted/not started successfully.
Retry failed items processing - number of attempts to restart the process;
Wait before each retry attempt - delay time before each shot to restart the process;
- Force quit - forcefully terminate the process if not completed within a few seconds. True, by default. The number of seconds until completion is 3 seconds, by default.
2. Monthly - monthly planner
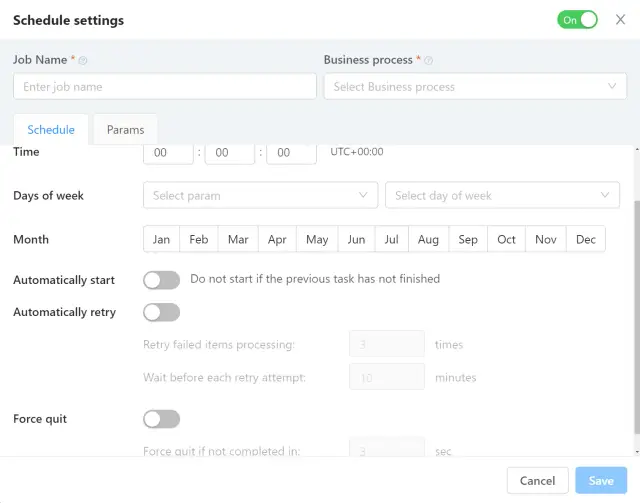
- Time - defines the time in UTC+0 at which the scheduler will start the selected BP;
- Days of the week - consist of two settings:
Repeat frequency:
- Every first
- Every second
- Every third
- Every fourth
- This day
Day of the week - defines the day of the week
- Month - the month is determined
- Auto Start - If set to True, a new PSU will not be started unless completed soon. Default value: False.
- Automatically retry - restarts the process automatically if it was interrupted/not started
Retry processing failed items - the number of process restarts;
Wait before each retry - delay time before each attempt to restart the process;
- Force Quit - Terminates a process if it is not completed within a few seconds. True, by default. The number of seconds until completion is 3 seconds, by default.
3. Periodically - allows you to flexibly configure the frequency of the scheduler
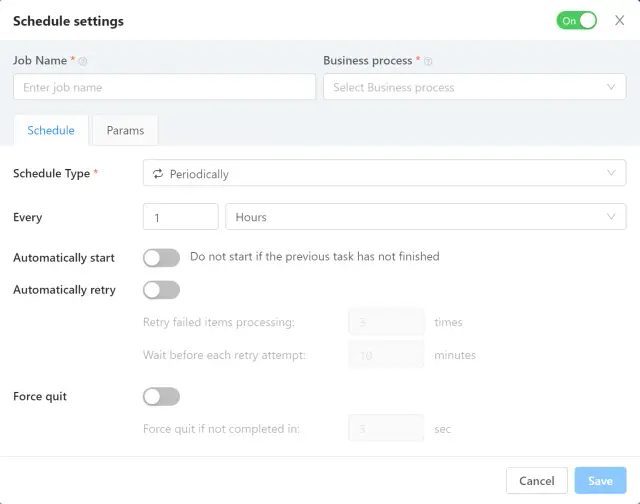
- Every - the ability to set repeatability every N seconds/minutes/hours/days. Default: every 1 hour.
- Automatically start - if set to True, a new BP will not start if the previous one has not been completed. Default value: False.
- Automatically retry - restarts the process automatically if it was interrupted/not started successfully
Retry failed items processing - number of attempts to restart the process;
Wait before each retry attempt - delay time before each shot to restart the process;
- Force quit - forcefully terminate the process if not completed within a few seconds. True, by default. The number of seconds until completion is 3 seconds, by default.
4. After starting the app - the single-time task planner
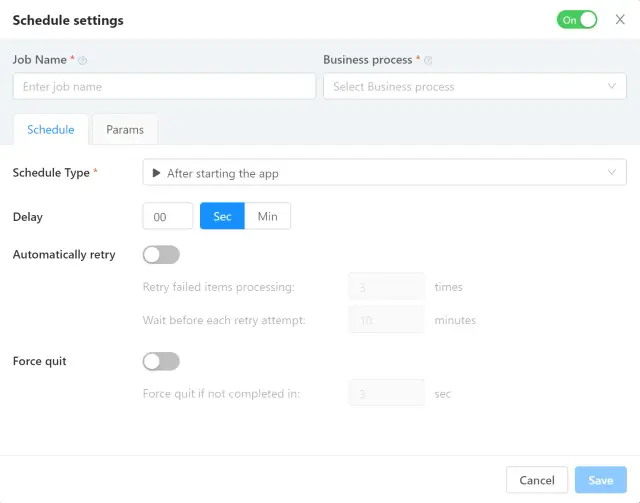
- Delay - defines the delay between application start and startup. Default - 0 sec
- Automatically retry - restarts the process automatically if it was interrupted/not started successfully
Retry failed items processing - number of attempts to restart the process;
Wait before each retry attempt - delay time before each shot to restart the process;
- Force quit - forcefully terminate the process if not completed within a few seconds. True, by default. The number of seconds until completion is 3 seconds, by default.
5. Before finishing the app - run the scheduler each time the application ends
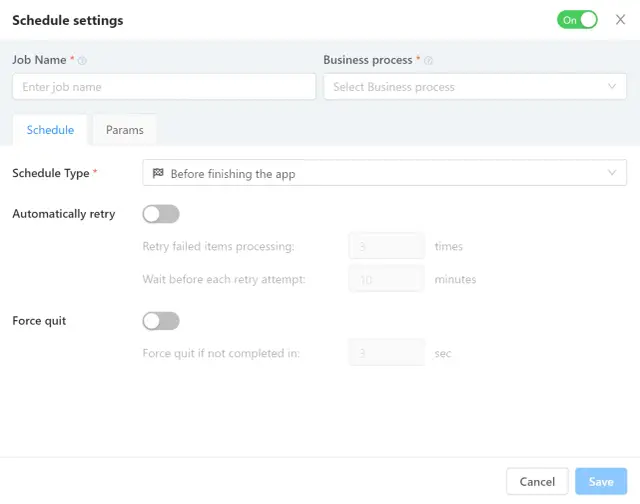
- Automatically retry - restarts the process automatically if it was interrupted/not started successfully
Retry failed items processing - number of attempts to restart the process;
Wait before each retry attempt - delay time before each attempt to restart the process;
- Force quit - forcefully terminate the process if not completed within a few seconds. True, by default. The number of seconds until completion is 3 seconds, by default.
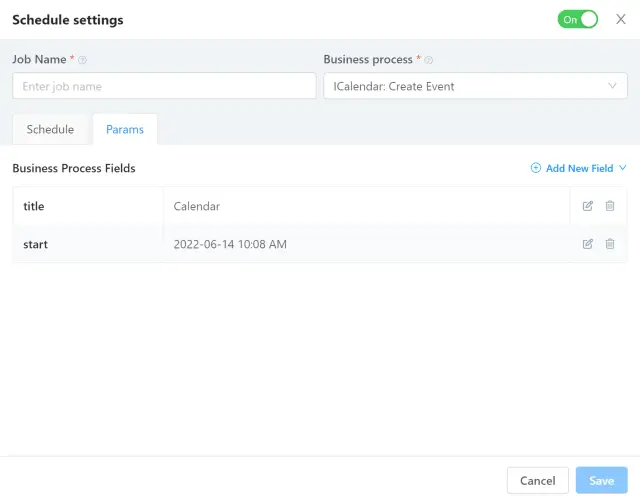
In the Params tab of the scheduler settings, it is also possible to pass parameters to the BP input when it is launched by the scheduler:
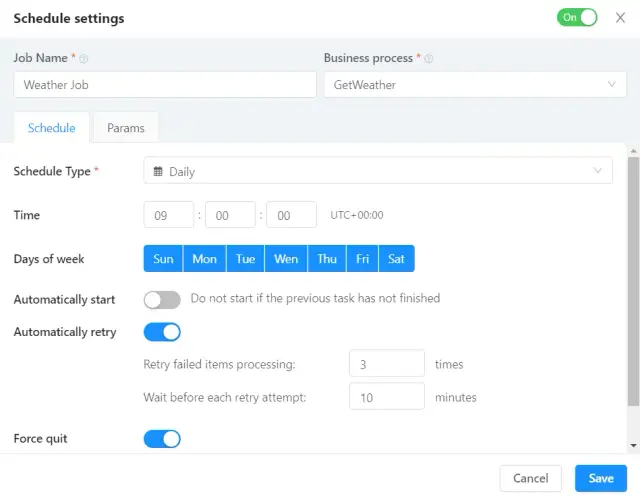
In our example, the scheduler settings look like this:
- Messages will be sent every day at 9 am UTC+0
- Automatically tries to restart the process 3 times with a delay of 10 minutes between attempts if the process did not start immediately;
- Forcefully terminates a process if it has not been completed within three seconds.
Our application lives and works in the backend, so for it to work, it is enough to publish it.