


 Jul 14, 2026
 8 min
8 minEquipment reservation app: prevent conflicts and track returns
Plan an equipment reservation app that prevents double bookings, records returns and damage, and places faulty items on maintenance hold.

Build a lost-and-found tracker for your venue that records item details, verifies claimants, tracks storage spots, and manages disposal dates.
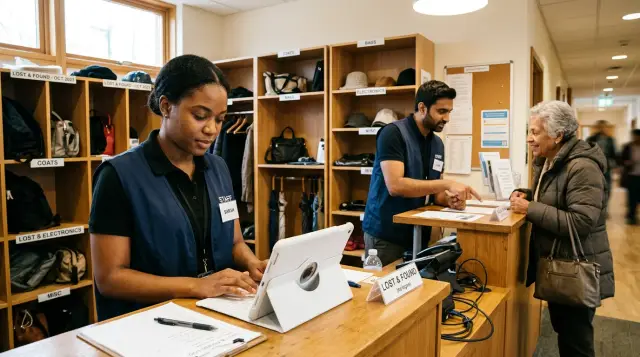
A busy venue can collect dozens of lost items in a weekend. Phones, coats, keys, wallets, glasses, and water bottles arrive through different staff members. Without one shared record, useful details disappear quickly: where staff found an item, what it looked like, and when it arrived.
Paper logs cause predictable problems. Someone writes "black jacket" but leaves out the brand, size, contents, and event area. Another employee finds a similar jacket and starts a second entry. Later, nobody knows whether the notes describe one item or two.
Handwritten records also stay in one place while the work happens elsewhere. The person answering a call may not see the notebook in the security office. An employee may move an item to a locked cabinet without changing the log. A guest then hears that their property is missing even though it is in storage.
A lost-and-found tracker gives every item one searchable record. It should capture enough detail to separate similar property and show its current status. A phone record, for example, might include its color, model, case, lock-screen image, found location, and storage shelf.
Claimant verification matters because a vague description is rarely enough. Someone who says they lost "a silver iPhone" could describe many devices. Before staff release it, they should ask for details the claimant is likely to know, such as the case design, a distinctive scratch, a phone number shown on screen, or the contents of a wallet.
Storage is another common weak point. Labels such as "back room" or "office" become useless when property moves and shifts change. Each record needs a precise location, such as "Security cabinet B, drawer 2," plus the name of the person who moved it.
The tracker should also handle disposal dates. When a record includes the received date, retention deadline, and final outcome, the venue can explain what happened to an item instead of relying on memory.
For most venues, a quick form, searchable item list, storage field, claimant check, and disposal date are enough to replace notebooks and uncertain handovers.
A lost-and-found tracker works best when each person sees only the actions they need. Front desk staff can log items and check their status. Security staff can add property found during patrols or after an event. A supervisor can handle disputes, approve releases, and review items that have stayed too long.
Set clear boundaries for every role. If everyone can edit every field, staff can overwrite storage locations, claimant notes, or pickup records. That makes disputes harder to settle.
A simple permissions setup might allow front desk staff to add records, search items, and record a handover after approval. Security staff can add found items and update locations when they move property into secure storage. Supervisors can correct records, approve exceptions, and release items. One named owner should review overdue items and decide whether staff retain, donate, dispose of, or escalate them under venue policy.
That named owner is especially important for disposal date tracking. They can review a weekly list of items nearing their retention deadline, confirm the storage location, and record the final decision.
Use individual accounts rather than a shared login. When someone changes "Shelf B, locker 12" to "security cabinet," the tracker should show who made the change and when. This history protects staff as much as the venue.
For example, a concert venue might let ushers submit a basic phone report with the item type, found location, and time. A front desk worker then checks the item into storage. Only a duty manager releases a phone, wallet, or bag after verification.
If you build the interface in AppMaster, create separate screens or actions for each role rather than relying on staff to remember procedures. Limiting the actions available to each role prevents many avoidable mistakes.
Two staff members should be able to describe and locate the same item without relying on memory. Keep the form short enough for busy shifts, but specific enough to separate similar items.
Start with a plain item type, such as "phone," "wallet," "jacket," or "set of keys." Add visible details staff can confirm quickly: color, brand, size where useful, and condition. "Black Apple iPhone with a cracked lower-right corner" is much easier to identify than "black phone."
Record the found location as precisely as the venue allows. "Balcony, row C, seat 14" is more useful than "auditorium." For property handed in by a guest, include the hand-in point and the employee who accepted it.
Each entry should show the date and time received. This creates a clear sequence when several similar objects arrive after a crowded event and supports retention tracking later.
A practical record includes:
Photos help staff compare items with claims, especially bags, jewelry, coats, and damaged devices. Take a clear picture of the item's visible condition, then limit access to employees who manage lost property.
Keep private identifiers separate from details a claimant can see. These might include a wallet's name, the exact contents of a bag, a device lock-screen image, or an engraving. Ask the claimant to provide those details before releasing the item, then compare their answer with the private notes.
In AppMaster, a form can separate public descriptions from staff-only notes. This makes the tracker easier to use and reduces the chance of handing property to the wrong person.
The location field must match the places staff use every day. Avoid labels such as "back room" and "storage area." They can mean different things to different shifts.
Use familiar physical locations: a reception cabinet, security office, coat check bin, or numbered shelf in the operations room. Put a clear label on every place where staff may leave found property.
Give each spot a short code and use it in the tracker. For example, "SEC-CAB-02" can mean security office, cabinet 2. "OPS-SH-B" can mean operations room, shelf B. A staff member should understand the code and find the item in under a minute.
Use a consistent naming pattern: start with the room or area code, add the furniture type, then finish with a number or letter matching the physical label. Put the same code on the cabinet, shelf, or bin and in the tracker.
Staff must update the record whenever they move an item. Someone may first log a phone at reception, then place it in a locked security cabinet before closing. The record should show the new location, who moved it, and the time. Otherwise, the tracker says one thing while the item sits somewhere else.
Store phones, wallets, passports, laptops, jewelry, car keys, and cash separately from general property. Keep them in a restricted area, such as a locked cabinet in the security office, and record every handoff.
For example, an employee finds a wallet after a concert. They create record LF-184, photograph the outside, and enter "SEC-CAB-02" as its location. If a supervisor later moves it to a safe, they change the record to "SEC-SAFE-01" immediately. The physical label and record remain matched for the next shift.
Staff should confirm that a person owns an item before handing it over. This protects guests, reduces arguments, and creates a record if someone later questions the release.
Keep public notices broad. Say that staff found "a pair of glasses" or "a bag" rather than listing the brand, color, contents, or unusual marks. Ask the claimant to supply those details first.
Someone claiming a black backpack should describe its brand, lining color, a distinctive sticker, and a few items inside. "It has my stuff in it" is not enough to release it.
When staff release an item, they should add a handover entry to the same record. Capture the claimant's name, one contact method such as a phone number or email address, the release date and time, the employee's name, and the proof checked.
Proof may include a matching photo, receipt, serial number, description of contents, or identification that matches documents found with the item. A claimant can sign the record if venue policy requires it.
Keep the status flow short:
Wallets, phones, IDs, keys, jewelry, and cash need stricter checks. Staff should verify more than one detail before release. For a phone, ask the claimant to unlock it or show device details. For a wallet, compare the name on an ID with the claimant and ask them to describe cards or contents without reading those details aloud.
For identification documents, record who collected them and check photo ID where practical. Do not hand over a passport or driving licence to someone who only knows the holder's name. If an employee is unsure, they should refer the claim to a manager.
A complete record makes a disputed handover easier to review because the item, evidence, employee, and release time sit together.
Use one agreed retention period based on the venue's approved policy. Some items need different treatment, including IDs, bank cards, medication, and anything that creates a safety concern. Put those exceptions in the policy and give staff a clear escalation route.
When staff log an item, the tracker should calculate a review or disposal date from the date found. If the venue keeps ordinary property for 30 days, a scarf found on 5 May has a review date of 4 June. Staff should not have to count days by hand.
Keep the date visible beside the storage location and status. Use clear outcomes such as held for collection, returned to claimant, donated, disposed of, or transferred to another team or authority.
An overdue-items view helps supervisors act before shelves become crowded. It should show the item description, date found, storage location, planned action date, and claimant contact already recorded. Review it weekly and record what happened rather than simply removing property from storage.
Final outcome records matter when someone calls after the retention period. If staff transferred a wallet to venue security or donated an umbrella after 30 days, the record should state the date, employee, and a short note. For sensitive items, include the receiving person or organization where policy allows.
In AppMaster, staff can create a date field for the item record, a calculated disposal date, and a filtered overdue-items screen. An action button can update the status and save the final outcome while preserving the item history.
Staff should be able to add an item while a guest waits nearby. Put the new-item form on the first screen and keep it focused on the description, category, date and time found, found location, and storage spot.
Use dropdowns where staff would otherwise enter slightly different versions of the same answer. Categories such as "phone," "wallet," "bag," and "jewelry" work better than free text. Apply the same approach to storage spots. Consistent choices make searches more reliable.
The search screen should let employees filter records by item type or a word in the description, date found, venue area, current status, and storage location. Show the item photo, description, and storage location in each result. Staff should not need to open several records to distinguish a black umbrella from a navy one.
Keep ordinary edits separate from releasing an item. Staff may need to correct a description or move property to another cabinet, but those changes should not mark it as returned. A separate "Release item" action can request claimant details, verification notes, release date, and employee name.
AppMaster lets teams build these forms and screens visually, then connect them to item records and staff permissions. Give most employees access to add, search, and update storage details. Limit item release to trained staff or supervisors.
After each save, show the item ID and storage spot. Staff can then label the item before handling the next guest.
A concert ends at 11 p.m., and the cleaning team finds several umbrellas near the east entrance. One is plain black, so the employee records more than its color: a curved wooden handle, a small silver band near the tip, the found location, and the time. They place it in locker B-14 and add that code to the tracker.
The next afternoon, a guest reports a missing black umbrella. A staff member searches recent umbrella records rather than checking every locker. The entry from the east entrance includes the storage code and short description.
The guest's first description is too broad because many umbrellas are black. The employee asks for a detail not included in the public description, such as the handle's shape and material. The guest describes a curved wooden handle with a silver band near the end. That matches the staff-only record.
The staff member marks the item as returned and records the collection date and time, the guest's name and contact detail if policy allows it, the verification detail provided, and the name or initials of the employee who released it. A signature or confirmation of receipt can provide extra evidence where needed.
The record remains available after handover. When the next shift asks why locker B-14 is empty, they can see that staff returned the umbrella at 2:15 p.m.
Run a short test with the employees who will log and return property. Create a few sample records with familiar descriptions, such as "black phone," "blue coat," and "canvas bag." Give each one a different storage location, retention date, and status. Then ask staff to find them using the words a guest would use.
Check that every new record includes a precise storage location and retention date. "Back office" is too vague. "Locker B, shelf 2" gives the next shift somewhere specific to look.
Make claimant notes required for the return action. Employees should record what the person said to identify the item, who released it, and when. This creates a clear history if two people claim the same property.
Test routine tasks before launch:
Before each disposal session, a manager or assigned employee should review overdue records, confirm that no active claim blocks disposal, and record the final outcome.
Small gaps often turn into arguments later. The tracker should show what staff found, where they placed it, who handled it, and how the item left the venue.
Do not publish a full description of every found item. A public notice can say "wireless earbuds found near the east entrance," but it should not reveal case markings, a sticker inside, or other identifying details.
Staff should update records when they put property away, not at the end of a busy shift. Make storage location required and use labels that match a shelf, locker, or sealed bag.
Personal messages can arrange collection, but they do not prove a handover. Record the release when the claimant collects the item, including the collection time, employee, verification method, and claimant name or reference number. For passports, wallets, and phones, staff can also record a signature or photo ID check if venue policy permits it.
Do not delete records after an item is returned, donated, or disposed of. Change the status instead. A closed record gives staff an answer when someone contacts the venue later.
AppMaster can require the important fields before staff save an item record. Status choices such as found, stored, claimed, released, and disposed preserve the history without separate spreadsheets.
Start with one area that has a steady flow of found property, such as the front desk, coat check, or an event hall. Ask staff to record every item for one week, including umbrellas and charging cables.
A short trial reveals practical gaps. A receptionist may need faster searches by event date. A security worker may need a storage field with both a cabinet number and shelf. Make changes that solve repeated problems, then review the records at the end of the week.
Check whether staff use the same categories, whether records include storage locations, and whether statuses match real work. Simple options such as "received," "awaiting claim," "returned," and "disposed" are usually enough.
AppMaster can turn this process into a no-code lost-property application. Teams can create item forms, searchable storage records, role-based staff accounts, and business rules for actions such as releases and overdue reviews. The platform can generate complete applications with web screens and mobile apps when a venue needs them.
Assign one person to the first review. They can correct duplicate categories, clarify unclear field names, and remind staff to add the disposal date when logging new property. Once the process works in the trial area, add other desks and locations with a short practice session using real examples.
Keep checking the tracker after launch. If employees still write notes on paper before entering them later, find out why. The form may ask for too much, the device may be too far from the desk, or the storage labels may not match the names in the app. Fix those problems early so the records remain reliable after busy events.
 What details should a lost-and-found record include?
Record the item type, visible description, found location, date and time received, storage location, status, and the employee who handled it. Add a photo for items that are hard to describe or have higher value.
How should we label storage locations?Use a precise code that matches a physical label, such as "SEC-CAB-02" or "Locker B-14." Staff should update the record as soon as they move the item and record who made the move.
How do staff verify that someone owns a lost item?Ask for details that do not appear in public notices, such as a case design, engraving, contents, serial number, or distinctive damage. For phones, wallets, IDs, keys, jewelry, and cash, check more than one detail before release.
What should we include in a public lost-property notice?Avoid publishing the full description. Say that staff found a bag, glasses, or wireless earbuds, then ask the claimant to describe the brand, color, markings, or contents privately.
What should staff record when returning an item?Keep the release action separate from ordinary edits. Record the claimant's name or reference, contact method if policy allows it, release date and time, staff member, and the proof checked.
Who should have access to edit the tracker?Use individual accounts and limit actions by role. Front desk staff can log and search items, security can update storage movements, and supervisors can approve releases, corrections, and disposal decisions.
How do we track disposal dates for found property?Set the deadline from your venue's approved retention policy when staff create the record. Show the date beside the status and storage location, then review overdue items weekly and record the final outcome.
What happens to records after an item is returned or disposed of?Do not delete it. Change its status to returned, donated, disposed of, or transferred, and save the date, employee, and a short outcome note. This gives staff an answer if someone contacts the venue later.
What features does a simple lost-and-found tracker need?A simple setup needs a new-item form, searchable item list, storage field, private verification notes, role permissions, and an overdue-items view. Dropdowns for categories and storage spots help staff enter consistent records.
Can I build a lost-and-found tracker without coding?AppMaster lets venue teams build a no-code application with item forms, searchable records, staff roles, status rules, and date-based overdue views. Teams can create web screens and mobile apps without starting with a paper log or separate spreadsheets.
Experiment with AppMaster with free plan.
When you will be ready you can choose the proper subscription.
 Jul 14, 20268 min
 Jul 13, 20268 min
 Jul 08, 20268 min