


Equipment reservation app: prevent conflicts and track returns
Plan an equipment reservation app that prevents double bookings, records returns and damage, and places faulty items on maintenance hold.
Release management for no-code apps: a practical branching and environment setup, rollback planning, and quick regression checks after requirements change.
When a platform regenerates your app from models and visual logic, a release can feel less like “shipping a small change” and more like “rebuilding the house.” That’s great for keeping code clean, but it breaks a lot of habits teams learned with hand-written code.
With regenerated code, you don’t patch a few files. You change a data model, a workflow, or a screen, and the platform produces a fresh version of the application. In AppMaster, backend, web, and mobile can all update from the same set of changes. The upside is no accumulated mess. The tradeoff is that small edits can have wider effects than you expect.
The pain usually shows up as:
“Safe” doesn’t mean “nothing will ever go wrong.” It means releases are predictable, problems show up before users report them, and rollback is fast and boring. You get there with clear promotion rules (dev to staging to prod), a rollback plan you can follow under stress, and regression checks tied to what actually changed.
This is aimed at solo builders and small teams shipping often. If you release weekly or daily, you need a routine that makes changes feel ordinary, even if the platform can regenerate everything with one click.
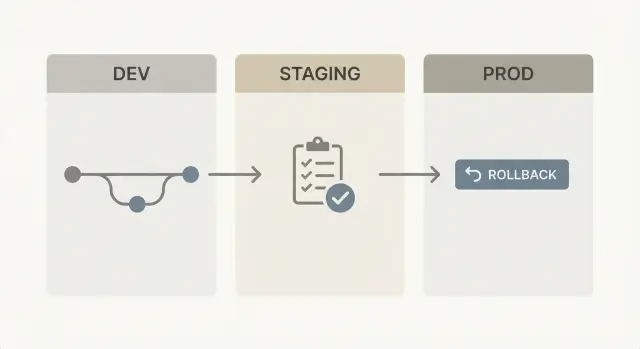
Even for no-code, the safest setup is still the simplest: three environments with clear jobs.
Dev is where you build and break things on purpose. In AppMaster, this is where you edit the data model, adjust business processes, and iterate on UI fast. Dev is for speed, not stability.
Staging is a rehearsal. It should look and behave like production, but without real customers depending on it. Staging is where you confirm that a regenerated build still works end to end, including integrations like auth, Stripe payments, email/SMS, or Telegram messaging.
Prod is where real users and real data live. Production changes should be repeatable and minimal.
A practical split that keeps teams aligned:
Promote changes based on confidence, not the calendar. Move from dev to staging when the feature is testable as a whole (screens, logic, permissions, and data changes together). Move from staging to prod only after you can run the key flows twice without surprises: once on a clean deploy, and once after a small configuration change.
Simple naming reduces confusion when things are tense:
Treat staging as a copy of production behavior, not a parking lot for “almost done” work.
Branching isn’t about protecting the code generator. It’s about protecting production behavior.
Start with one mainline branch that matches what’s in production and is always releasable. In AppMaster terms, this mainline represents the current Data Designer schema, business processes, and UI state users rely on.
A practical setup:
Keep feature branches small and short. If a change touches data, logic, and UI, split it into two or three merges that each leave the app in a working state (even if the feature is hidden behind a toggle or only visible to admins).
Use a release branch only when you need time to stabilize without blocking new work, such as multiple teams shipping in the same week. Otherwise, merge to main frequently so branches don’t drift.
A few merge rules prevent “regen surprises”:
Example: if you add an approval step, merge the workflow logic first while the old path still works. Then merge UI and permissions next. Smaller steps make regressions easier to spot.
Consistency isn’t about cloning everything. It’s about keeping the right things identical.
Your app definition (data model, logic, UI) should move forward safely, while each environment keeps its own settings. In practice, dev, staging, and prod should use the same generated code and the same schema rules, but different environment values: domains, third-party endpoints, rate limits, and feature toggles.
Secrets need a plan before you need them. Treat API keys, OAuth client secrets, and webhooks as environment-owned, not project-owned. A simple rule works well: developers can read dev secrets, a smaller group can read staging secrets, and almost nobody can read prod secrets. Rotate keys on a schedule, and rotate immediately if a prod key ever lands in a dev tool.
Staging should be “same as prod” in the ways that catch failures, not in the ways that create risk:
Avoid copying production data into staging unless you must. If you do, mask personal data and keep the copy short-lived.
Example: you add a new approval step in a Business Process. In staging, use a test Stripe account and a test Telegram channel, plus synthetic orders that mimic your largest real order. You’ll catch broken conditions and missing permissions without exposing customers.
If you’re using AppMaster, keep the app design consistent across environments and change only environment settings and secrets per deployment. That discipline is what makes releases feel predictable.
When your platform regenerates code after every change, the safest habit is to move in small steps and make each step easy to verify.
Write the change as a small, testable requirement. One sentence a non-technical teammate can confirm, such as: “Managers can add an approval note, and the request stays Pending until a manager approves.” Add 2-3 checks (who can see it, what happens on approve/reject).
Build it in dev and regenerate often. In AppMaster, that usually means updating the Data Designer (if data changes), adjusting the Business Process logic, then regenerating and running the app. Keep changes tight so you can see what caused a break.
Deploy that same version to staging for full checks. Staging should match production settings as closely as possible. Confirm integrations using staging-safe accounts.
Create a release candidate and freeze briefly. Pick a build as RC. Stop merging new work for a short window (even 30-60 minutes) so test results stay valid. If something needs fixing, fix only that issue and cut a new RC.
Deploy to prod, then verify the top user flows. Right after release, do a quick smoke pass on the 3-5 flows that make money or keep operations moving (login, create request, approve, export/report, notifications).
If anything feels unclear in staging, pause. A calm delay is cheaper than a rushed rollback.
With regenerated code, “rollback” needs a clear meaning. Decide up front whether rollback is:
Most real incidents need both: code back plus a config reset that restores third-party connections and toggles to the last known-good state.
Keep a simple record for every environment (dev, staging, prod): release tag, deployment time, who approved it, and what changed. In AppMaster, that means saving the exact app version you deployed and the environment variables and integration settings used. Under stress, you shouldn’t be guessing which build was stable.
Database changes are what most often block fast rollback. Split changes into reversible and irreversible. Adding a nullable column is usually reversible. Dropping a column or changing what values mean often isn’t. For risky changes, plan a forward-fix path (a hotfix you can ship quickly) and, if needed, a restore point (backup taken right before release).
A rollback plan that’s easy to follow:
Practice in staging. Run a fake incident monthly so rollback becomes muscle memory.
The best regression checks are tied to what could break. A new field in a form rarely requires retesting everything, but it can affect validation, permissions, and downstream automation.
Start by naming the blast radius: which screens, roles, data tables, and integrations are touched. Test the paths that cross that radius, plus a few core flows that must always work.
Golden paths are must-pass workflows you run every release:
Write expected results in plain language (what you should see, what should be created, what status changes). That becomes your repeatable definition of done.
Treat integrations like mini-systems. After a change, run one quick check per integration, even if the UI looks fine. For example: a Stripe payment completes, an email template renders, a Telegram message arrives, and any AI call returns a usable response.
Add a few data sanity checks that catch silent failures:
On platforms like AppMaster, where apps can be regenerated after edits, focused checks help confirm the new build didn’t change behavior outside the intended scope.
Minutes before pushing to production, the goal isn’t perfection. It’s catching the failures that hurt most: broken sign-in, wrong permissions, failed integrations, and silent background errors.
Make staging a real dress rehearsal. In AppMaster, that usually means a fresh build and deploy to staging (not a half-updated environment) so you’re testing what you’ll ship.
Five checks that fit in about 10 minutes:
If your app uses automation, add one quick silent-failure check: trigger one scheduled/async job and confirm it completes without duplicating work (two records, two messages, two charges).
If any check fails, stop the release and write down exact steps to reproduce. Fixing a clear, repeatable issue is faster than pushing and hoping.
Your ops team uses an internal tool to approve purchase requests. Today it’s two steps: requester submits, manager approves. The new requirement: add a finance approval step for anything over $5,000, and send a notification when finance approves or rejects.
Treat it as a contained change. Create a short-lived feature branch from your stable mainline (the version currently in prod). Build in dev first. In AppMaster, that usually means updating the Data Designer (new status or fields), adding logic in the Business Process Editor, then updating web/mobile UI to show the new step.
When it works in dev, promote that same branch to staging (same config style, different data). Try to break it on purpose, especially around permissions and edge cases.
In staging, test:
Deploy to prod during a quiet window. Keep the previous prod release ready to redeploy if finance approvals fail or notifications go out incorrectly. If you included a data change, decide up front whether rollback means “redeploy old version” or “redeploy old version plus a small data fix.”
Document the change in a few lines: what you added, what you tested in staging, the release tag/version, and the biggest risk (usually permissions or notifications). Next time requirements shift, you’ll move faster with less debate.
Painful releases rarely come from one huge bug. They come from shortcuts that make it hard to see what changed, where it changed, and how to undo it.
One common trap is long-lived branches kept around “until it’s ready.” They drift. People fix issues in dev, tweak staging, and hotfix prod. Weeks later, nobody can tell which version is real, and merging becomes a risky guess. With platforms like AppMaster, short-lived branches and frequent merges keep changes understandable.
Another release killer is skipping staging because “it’s just a small change.” Small changes often touch shared logic: validation rules, approval steps, payment callbacks. The UI change looks tiny, but the side effects show up in production.
Manual production tweaks are also expensive. If someone changes environment variables, feature flags, payment keys, or webhooks directly in prod “just once,” you lose repeatability. The next release behaves differently and nobody knows why. Record every production setting change as part of the release, and apply it the same way every time.
Rollback mistakes tend to hurt most. Teams roll back the app version but forget data may have moved forward. If your release included a schema change or new required fields, old code can fail against new data.
A few habits prevent most of this:
Without a “done” signal, releases never really finish. They just fade into the next emergency.
Release stress comes from decisions made on release day. The fix is deciding once, writing it down, and repeating it.
Put your branching rules on one page, in plain language anyone can follow when you’re not around. Define what “done” means for a change (checks run, sign-off, what counts as a release candidate).
If you want a strict structure, a simple rule set is:
Make environments feel different on purpose. Dev is for fast changes, staging is for proving the release, prod is for customers. Lock down prod access and give staging a clear release gate owner.
If you’re building on AppMaster, the platform’s “regenerate clean source code” approach is most comfortable when you pair it with disciplined environments and quick golden-path checks. For teams evaluating tools, AppMaster (appmaster.io) is built for full applications (backend, web, and native mobile), which makes this kind of release routine especially useful.
Ship smaller and more often. Pick a cadence (weekly or twice a month) and treat it as normal work. Smaller releases make reviews quicker, rollbacks simpler, and “I hope this works” moments rare.
Use three environments: dev for fast changes, staging for a production-like rehearsal, and prod for real users. This keeps risk contained while still letting you ship often.
Because regeneration can rebuild more than you intended. A small change to a shared field, workflow, or permission can ripple across screens and roles, so you need a repeatable way to catch surprises before users do.
Treat staging as a rehearsal that mirrors production behavior. Keep the same schema rules and core integrations, but use staging-safe accounts and separate secrets so you can test end to end without risking real money or real users.
Start with one mainline branch that matches production and is always releasable, plus short-lived feature branches for single changes. Add a release branch only when you need a brief stabilization window, and keep hotfix branches minimal and urgent.
Split it into smaller merges that each leave the app working. For example, merge workflow logic first (keeping the old path working), then UI and permissions, then any stricter validation, so regressions are easier to spot and fix.
Store them as environment-owned and limit who can read them, especially in production. Use separate keys per environment, rotate them on a schedule, and rotate immediately if a production key ever ends up in a dev tool.
Pick one tested build as the RC and pause new merges briefly so test results stay valid. If you find an issue, fix only that issue and cut a new RC, instead of piling on extra changes mid-test.
Decide in advance whether rollback means redeploying the previous build, restoring the previous configuration, or both. In most incidents you need both, plus a quick verification of the 3–5 critical user flows right after rollback.
Assume schema and validation changes can block rollback. Prefer reversible changes first (like adding nullable fields), and for risky changes plan a forward-fix path and take a backup right before release if you might need to restore data.
Run a short set of golden paths every release, then test only what’s in the blast radius of your change (screens, roles, tables, integrations). Separately smoke-test each integration once so silent failures show up early.
Experiment with AppMaster with free plan.
When you will be ready you can choose the proper subscription.


