


Equipment reservation app: prevent conflicts and track returns
Plan an equipment reservation app that prevents double bookings, records returns and damage, and places faulty items on maintenance hold.
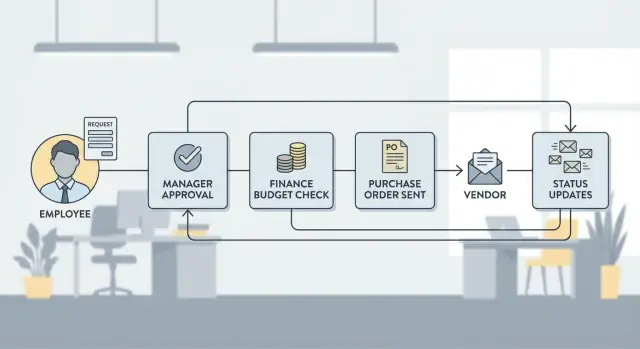
Use this procurement request app blueprint to design approvals, budget checks, purchase orders, and vendor communication with clear roles and statuses.
Email threads and spreadsheets fail in the same predictable ways. Requests get buried. Files splinter into "final_v7" versions. Approvals happen in side chats with no record. When someone asks, "Are we cleared to buy this?" the answer depends on who’s online and which sheet they trust.
A request app should make the status obvious at any moment. You should be able to open a request and immediately see who submitted it, what they want to buy, the expected cost, and what happens next. It also needs a clean history: who approved or rejected, when they did it, and what changed afterward.
At a minimum, every request should answer these questions without digging:
Scope is where many teams overbuild. Decide early whether you’re covering request to purchase order only, or also later steps like invoice matching and goods receipt. Request to PO is usually the best first milestone: it forces clean approvals and budget checks, but keeps the project contained.
Keep the first version simple. Start with one team, one approval path, and a clear definition of “done.” For example, IT requests under $1,000 might need manager approval only, while larger purchases route to finance.
If you want to build this quickly without writing code, AppMaster is a practical option. You can model request data, set up approval steps, and generate a production-ready web and mobile app from the same blueprint.
A procurement request app lives or dies by permissions. If the wrong person can change a request after approval, or teams can’t see what they need, the process becomes slow and risky.
Start by naming clear roles. Titles vary by company, but most apps need stable responsibilities: requesters (create requests and answer questions), managers (confirm need and timing), procurement (validate vendors and create POs), finance (confirm budget and policy), and one or more approvers (sign-off authority). Some workflows also include a limited-access vendor contact for shared, external-facing details.
Then define what each role can do at each stage. One rule prevents many disputes: once a request is submitted, the requester can only edit clarifications (notes, attachments, delivery details). Price, vendor, quantity, currency, and cost center should be treated as hard fields that require a formal change and re-approval.
Visibility rules should be just as clear. Requesters should see their own requests and status. Managers should see requests from their direct reports. Procurement and finance usually need cross-department visibility. Vendor contacts should never see internal notes, budget data, or other vendors.
Delegation matters because approvals can’t stop when someone is out. Support planned delegation (vacation) and emergency backup (sick days). Delegation should pass approval rights, but not the ability to rewrite the request.
Cross-department requests are common (for example, IT buying software for Marketing). Separate “requester team” from “cost center owner.” Route approvals to the cost center owner, and show both in the record so it’s obvious who requested and who pays.
In AppMaster, you can model roles, record ownership, and stage-based actions in the data model and business processes, so the same rules apply across web and mobile screens.
A good procurement request app starts with a clean data model. If your tables are clear, approvals, budget checks, and purchase orders become easier to automate and report on.
Most teams cover the majority of cases with a small set of entities:
For Requests, include fields that help routing and reduce back-and-forth: requester, department, cost center, need-by date, business justification, and attachments (quotes, specs, screenshots). A simple preferred vendor reference helps, even if vendor selection is finalized later.
Statuses work best when they’re explicit and backed by timestamps. Keep one status field on Requests (Draft, Submitted, Approved, Rejected, Ordered, Closed), and store key dates like submitted_at, approved_at, rejected_at, ordered_at, and closed_at. This makes reporting (cycle time, aging, bottlenecks) straightforward without guessing from logs.
For PurchaseOrders, separate the PO header (number, vendor, ship-to, bill-to, payment terms) from PO line items, and link back to the original request and items. That traceability matters when prices change.
Approvals are your audit trail, but you usually need more than “approved/rejected.” Store who acted, when, what they decided, and why.
A lightweight approach is an Activity/Audit table that records actor_user_id, entity_type, entity_id, action, old_value, new_value, and created_at. In AppMaster, this maps cleanly in the Data Designer and can be filled automatically from business processes so every change is traceable.
A procurement request app only works when everyone uses the same vendor facts. Treat your vendor table as the single source of truth, not something people retype into each request. When vendor details live in one place, approvals move faster and finance sees fewer surprises.
Start with a vendor record that holds the basics you reuse: legal name, display name, tax ID (if you use it), default currency, billing address, and payment terms. Store the main accounts payable email, and allow multiple contacts so the right person is used for quotes vs invoices.
Add a vendor status so the app can block risky purchases consistently: Active (can be selected), Pending review (allowed, but routes to extra validation), and Blocked (cannot be used without review).
Communication tracking prevents the "who emailed them last?" problem. Create a Communication (or VendorInteraction) entity linked to Vendor and, when possible, linked to a specific Request, Quote, or Purchase Order. Each record should capture channel (email, call, meeting), direction (outbound/inbound), timestamp, owner, and a short summary. If you collect quotes, store them as structured records (amount, currency, validity date) and attach files when needed.
A few rules usually keep vendor data clean without slowing people down:
If you build this in AppMaster, you can model Vendor, VendorContact, and VendorCommunication in the Data Designer and show a timeline on the request and PO screens so the full history is one click away.
A budget check answers a simple question: do we have enough approved money for this request right now? Decide early if your company treats budget as a hard stop (can’t move forward) or a warning (can continue, but needs extra approval). That one choice changes the whole experience for requesters and approvers.
Budget can come from different places, so make the source explicit. Common options are an annual department budget, a project budget, or a monthly cap for a cost center. If a request can split across sources, capture split amounts per source so reporting stays clean.
To avoid surprises, calculate expected spend the same way finance will later. A request app is only useful if everyone sees the same number before approval.
A simple calculation checklist most teams use includes the line items total (qty x unit price), discounts, tax, shipping and handling, and currency conversion (store the rate and rate date). Then compare expected spend to available budget (budget minus already committed amounts). If you track commitments, include pending requests and open POs, not just paid invoices.
When budget is missing, don’t force the requester to guess. Pick one path and encode it in the workflow: route to the budget owner to assign a source, allow a one-time override with finance approval, return the request with a “budget details” task, or auto-reject categories that always require a budget.
Example: a team requests a new laptop bundle. The app calculates item cost plus tax and shipping, converts it to the department currency, and flags that only $900 is available against a $1,150 request. If you treat this as a warning, it can still go to the manager, but finance approval becomes mandatory.
In AppMaster, you can model budget sources in the Data Designer and run the check as a Business Process step before the first approval decision.
Approvals are where a request app either saves time or turns into a slow inbox relay. Keep the default path simple, then add rules only where they prevent real risk.
Start by defining what each approval protects. A common set is manager approval (need and priority), finance approval (budget and accounting), and procurement approval (vendor and buying method). Add security and legal only when certain categories or vendors require it.
Routing rules should be predictable. People should be able to guess what happens next before they click Submit. Typical routing factors are amount thresholds, category-based routing (software to security, contracts to legal), vendor risk level, department or cost center rules, and purchase type (CapEx vs OpEx, subscription vs one-time).
Use sequential approvals when order matters. For example, finance might block a request missing a cost center, so it’s better to catch that before procurement spends time negotiating. Use parallel approvals when teams can review independently, like security and legal reviewing a standard SaaS purchase while finance checks the budget.
Plan for a clean rework loop. When an approver sends a request back, the requester should add missing details and resubmit without losing history. Keep an approval log with timestamps, comments, and the version of key fields like amount, vendor, and category.
Example: a $12,000 SaaS tool routes to manager and finance first. After both approve, security and procurement run in parallel. If security flags missing data processing details, it goes back to the requester, then returns to the same step with the audit trail intact.
If you build this in AppMaster, model workflow states and transitions in a Business Process so routing stays visible and easy to adjust as policy evolves.
A good flow keeps requests moving without letting details drift. Capture enough information early, then freeze what matters once reviews start.
A practical sequence for most teams looks like this:
Example: a support team requests 10 new headsets. They attach the quote, select the IT Supplies category, and submit. The app checks the IT budget, routes to the team lead (under $1,000) and then finance (over $500). After approval, the PO is generated and sent, and the buyer logs confirmation and delivery date.
In a no-code tool like AppMaster, this usually becomes a few screens (Draft, Review, PO) plus a Business Process that locks fields, runs budget logic, and creates the PO record automatically.
A purchase order (PO) is only useful if it’s consistent, traceable, and hard to change by accident. In your workflow, the PO should become a stable record that vendors and finance can trust.
Generate the PO number when the PO is officially issued to the vendor, not when someone starts drafting it. Drafts get deleted, restarted, and merged. That’s how gaps and duplicates happen.
To avoid duplicates, store the next PO number in one controlled place and assign it with an atomic step (one action that either succeeds fully or fails). If you need human-friendly numbers, add a prefix like legal entity or year, but keep the unique counter as the part that never repeats.
Split the PO into a header and line items. The header holds context; the lines hold what you’re buying.
Keep the header focused: vendor and contact, ship-to and bill-to details, currency, payment terms, expected delivery date, status (Draft, Issued, Acknowledged, Closed), and a quote reference.
Line items should be strict enough for invoice matching later: description, quantity, unit, unit price, tax, discount, and a cost center or budget code. Totals should be calculated, not typed in.
Decide upfront when a revision is allowed. Small changes like delivery date or notes can be a revised version (for example, PO-1042 v2) with a clear “supersedes v1” link. Big changes like vendor, currency, or a material change in total usually deserve “cancel and reissue” so nobody ships against the wrong document.
Example: a request is approved for 10 laptops, but the vendor quote changes from 2-week delivery to 8-week delivery. Create a revision with the updated delivery date and keep the original quote details attached so the PO always matches what was agreed.
If you build this in AppMaster, model the PO header, line items, and PO versions as separate entities so revisions stay clean and auditable.
Notifications determine whether an internal procurement workflow feels smooth or turns into a thread-hunt. Treat messages as part of the process and tie them to a status change or a clear next action.
Start with a small set of internal updates so people don’t tune them out: approved/rejected, budget check failed or needs clarification, PO created and ready to send, overdue approval or overdue delivery date, and PO changed or cancelled.
Every notification should be readable in 10 seconds. Use a consistent template with request title, total amount, current status, and exactly what the recipient should do next. For approvers, include a short reason for the spend and the most important line items.
Vendor communication should be structured too. Vendors mostly need PO sent, PO change, cancellation, and delivery questions. Store every outbound and inbound message on the vendor thread for that PO or request. Track outcomes with simple fields like status (draft, sent, delivered, failed), vendor_response (none, replied, bounced), follow_up_needed (yes/no), and follow-up date.
Example: a laptop request is approved, the PO is sent, and the vendor replies that the model is backordered. The app logs the reply, sets follow_up_needed to yes, and notifies the requester to pick an alternative. In AppMaster, you can connect status changes to email/SMS/Telegram steps and save the message outcome alongside the PO.
The biggest risk isn’t missing features. It’s building the wrong rules and teaching the company to work around them.
One common failure is turning the request into a maze of statuses. If people can’t tell what “Pending validation” vs “Under review” means, they stop updating it and your data becomes noise. Keep statuses tied to clear actions and owners. Each status should answer one question: “What happens next, and who does it?”
Another trap is approvals with no owner or deadline. Requests get stuck when the approver is on leave or the role is unclear (“Finance” is not a person). Add backup coverage and a simple time expectation, even if it’s informal.
These mistakes cause the most rework:
Edits after approval deserve special attention because small “harmless” changes often change risk. If someone gets approval for 10 laptops at $900 each, then later changes the line item to a higher model or increases quantity, you can end up with approvals that don’t reflect what was purchased.
Also, don’t treat budget validation as a single yes/no field. Finance usually cares about how spend is reported: department, project, GL account, and time window. If your app checks budgets monthly but finance reports quarterly, your “available budget” will always look wrong.
If you build this in AppMaster, lock key fields after approval and record every exception as an event (who, when, what changed, and why). That audit trail is what saves you during disputes and audits.
Before launch, write down the basics. Most “approval chaos” happens because one small rule or required field is missing.
A simple launch checklist:
Once those rules exist, add quick validations that run before a request can move forward: vendor selection (or a clear new-vendor path), budget coverage for the right period, pricing evidence, complete shipping/billing details, and a real business reason.
Example scenario: a team lead submits a laptop request for a new hire starting next week. They choose the preferred vendor, attach the quote, and tag the right cost center. The manager approves because it matches the hiring plan. Finance approves after the budget check passes. Procurement creates the PO, sends it to the vendor, and logs the vendor’s confirmation and expected delivery date in the same record so the requester can track progress without extra emails.
Next steps: prototype your data model and workflow rules, then test with a small pilot team and one or two purchase categories. In AppMaster, you can build the tables in the Data Designer and map routing logic in the Business Process Editor. Run a short pilot, review where requests get stuck, tighten required fields, and then roll it out more widely. If you want to see how this approach translates into an actual app build, AppMaster (appmaster.io) is designed for creating full internal tools with approval logic, APIs, and both web and native mobile interfaces from the same model.
Start with request to PO. It forces clear approvals, budget checks, and traceability without dragging you into invoice matching and receiving right away. You can add downstream steps after the team trusts the first milestone.
Use a small, explicit set like Draft, Submitted, Approved, Rejected, Ordered, and Closed. Each status should clearly indicate who owns the next step and what action is expected, so nobody has to interpret vague labels.
Lock key fields at submission and require a formal change that triggers re-approval for anything that affects risk or spend, such as vendor, currency, quantity, unit price, cost center, or total. Allow only clarifications like notes, attachments, or delivery details without restarting the whole process.
Define roles first, then define what each role can do at each stage. A simple default is: requesters see and edit their own drafts, managers see direct reports, and finance/procurement have cross-department visibility, while vendor contacts never see internal notes or budget data.
Make delegation a built-in feature, not an exception. Delegation should transfer approval rights for a time window, but it should not allow the delegate to rewrite the request content, so accountability stays intact.
Separate who requested the purchase from who pays for it. Route approvals to the cost center owner even if the requester is from another team, and store both parties on the record so it’s always clear who initiated and who is accountable for budget.
Calculate expected spend the same way finance will later, including tax, shipping, discounts, and currency conversion with a stored rate and date. Decide upfront whether insufficient budget blocks the workflow or allows escalation with an extra approval step.
Keep a vendor master table as the single source of truth, and select vendors from a list rather than free text. Add a vendor status like Active, Pending review, and Blocked so risky vendors are consistently routed or prevented without relying on memory.
Generate the PO number only when the PO is officially issued, not when someone starts drafting. Assign it in a single controlled step to avoid duplicates, and keep the PO header and line items structured so totals are calculated rather than manually typed.
Yes, if you need a fast build without writing code. With AppMaster, you can model the data, define stage-based permissions and approval routing, and generate production-ready web and native mobile apps from the same model, which helps keep the workflow consistent across devices.
Experiment with AppMaster with free plan.
When you will be ready you can choose the proper subscription.


