


Equipment reservation app: prevent conflicts and track returns
Plan an equipment reservation app that prevents double bookings, records returns and damage, and places faulty items on maintenance hold.
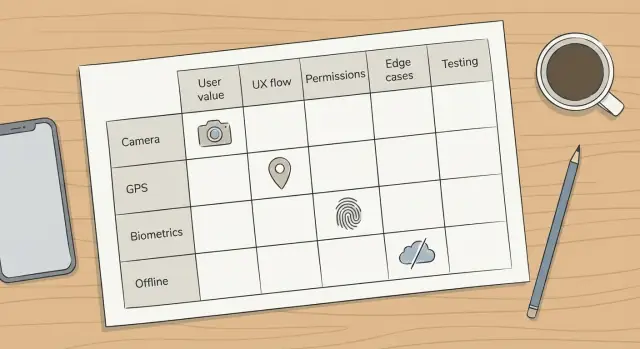
Use a planning matrix for native mobile capabilities in no-code apps to scope camera, GPS, biometrics, and offline storage with clear UX, permissions, and review-ready specs.
Camera, GPS, biometrics, and offline mode sound like simple add-ons. In practice, they touch device hardware, privacy rules, and a long list of edge cases. That’s why native mobile capabilities in no-code apps often trigger last-minute delays.
Most stalls start with unclear scope. A designer mocks a clean flow, then QA tests real behavior: weak signal, low light, a user who denies permissions, or a phone that kills the app in the background. Each surprise creates rework across UX, business logic, and test cases, right when release review is already strict.
The hard part isn’t the happy path. The hard part is agreeing on the minimum acceptable behavior before you build:
A simple planning matrix forces these decisions early. It makes tradeoffs visible (speed vs privacy, convenience vs security), turns edge cases into requirements, and turns vague ideas into testable statements.
Example: a field tech app may “need GPS,” but the real question is whether it needs continuous tracking or just a location stamp when a job is completed. That one choice changes permissions, battery impact, and what reviewers expect.
A feature planning matrix is a one-page table that helps you agree on scope before anyone builds. For mobile capabilities, it keeps teams aligned on what the feature is for, what the user sees, and what reviewers will test.
Make the rows the capabilities you might add, like camera, GPS, biometrics, and offline storage. Then add columns that force clear decisions. You’re not writing a full spec yet. You’re making sure the same questions are answered for every feature: the user goal, the UX flow, the permissions you’ll request, the data you collect or store, the edge cases, and short test notes.
Ownership matters. Pick one person to maintain the matrix (often a product owner or lead designer), and review it on a steady rhythm: weekly, or before each release review. The matrix only helps if it stays current when scope changes.
One rule prevents most late surprises: every feature needs a fallback path. The app should still work in a limited but honest way when a user says no, a device lacks hardware, or the OS blocks the request. For example: manual entry when there’s no camera, address selection when there’s no GPS, PIN/password when biometrics fails, and an “online required” message (plus drafts where possible) when offline work isn’t supported.
If you’re building with a platform like AppMaster, the matrix also helps you map scope to screens, logic, and data models before you start wiring things together.
Treat the matrix like a promise you can test later, not a wish list. For each capability, write one clear “job” from the user’s point of view. Example: “A field tech takes a photo of a meter and attaches it to today’s visit, even with weak signal.” This keeps the feature tied to real work.
Next, force the feature into a short happy path. If you can’t describe the flow in a handful of screens, the scope isn’t ready. You don’t need design polish yet, just the order of actions and what the user sees.
Then map permissions to moments. Avoid asking on app launch “because we’ll need it later.” Decide the exact screen and action that triggers the request, and the one sentence you’ll show before the system prompt.
For each row in the matrix, capture:
Finish with acceptance criteria that match real testing, not opinions. For example: “If camera permission is denied, the user can still submit the form without a photo and sees clear steps to enable access later.” Or: “If biometric login fails three times, the app offers PIN/password without blocking the account.”
If you’re building in AppMaster, locking these decisions before you connect screens and business logic reduces rework because the matrix already covers UX, permissions, and edge cases that tend to surface late.
Camera features feel simple until you define what “done” means. Pick one primary user action and design around it: scan an ID, take a job site photo, or choose an existing image from the gallery. Each choice changes screens, permissions, and QA coverage.
Decide how much control users get after capture. “Photo only” is the easiest to ship. As soon as you add cropping, rotation, multi-photo, or annotation, you add extra states: retake, cancel, save draft, and compatibility across screen sizes. If you need edits, set a minimum (for example, retake and basic crop) and skip everything else.
Storage is part of scope, not an implementation detail. If the photo is evidence (delivery proof), upload immediately when possible and show progress. If it supports a later step (fill a form, then submit), store it temporarily on-device and upload on submit. Define what happens if upload fails: queue it for later, or block the user until it succeeds.
Plan the failure paths that usually trigger tickets: low light or blurry capture (tip + retake), permission denied (fallback like gallery upload and a clear retry path), mid-capture cancel (discard vs draft), large images on slow networks (compress or cap resolution), and interrupted capture (call/app switch) with a graceful recovery.
Write privacy notes in plain language: what you capture, whether location metadata is kept, where images are stored (device vs cloud), and how long you retain them.
GPS gets messy when “use location” is the whole requirement. Start with a single goal: a one-time check (where am I right now), background tracking (updates when the app is closed), or route logging (a trail of points over time). Each goal changes permissions, battery use, and what reviewers expect you to justify.
Describe accuracy and update frequency in plain words. “Pin the job within 50 meters” and “update every 2 minutes while a visit is active” is easier to review than “high accuracy, frequent updates.” Decide what happens if the app can’t get a fix: wait, retry, or let the user continue without location.
Permission timing matters as much as the feature. Asking on app launch often leads to denial because users don’t see value yet. Asking right before the action (“Add current location to this report”) usually works better. Background tracking is different: request it only after the user opts into a feature that clearly needs it.
Plan edge cases up front: GPS turned off or airplane mode, weak signal/indoor work, permission denied, last-known location being stale, and battery saver limiting background updates.
Reduce worry by showing when location is used. A small status line like “Location captured for this visit only” or a badge during tracking builds trust.
Example: if a field service team only needs a check-in location when a technician starts a job, scope it as “capture once on tap,” store it with the work order, and show a clear message if GPS is off. Avoid route logging unless you truly need it.
Biometrics can make an app feel fast and safe, but it also creates new ways for people to get stuck. Plan it like a safety feature, not just a convenience button.
Start by deciding what biometrics protects. For most teams, it works best as a quick re-auth step (opening the app after a short timeout) or to confirm sensitive actions like approving a payment, exporting data, or changing bank details. Using biometrics as the only login method is where lockouts and support tickets begin.
Pick a fallback that fits your risk level and users. Common options include password/passcode for standard accounts, one-time codes (SMS/email) for stronger recovery, magic links for fewer passwords (with account control), or admin-assisted recovery for high-stakes business apps.
Make enrollment opt-in. Offer it after a successful sign-in, explain the benefit in one sentence, and let people turn it off later.
Design for device limits and failures: no biometrics hardware, biometrics not set up, sensor failure (wet fingers/face not recognized), and OS lockouts after repeated failures.
Use clear copy that reduces fear. Say what you store and what you don’t: you’re not saving fingerprints or face data, you’re asking the phone to confirm the user.
Offline features fail most often because teams try to “make it work offline” without defining what “work” means. Start with the smallest offline goal that still helps: read-only access, draft capture, or a complete workflow.
Imagine a user with no signal for 30 minutes. What must they do to finish their task without losing work? A field technician might need today’s job list (read-only), the ability to add notes and photos (draft capture), and a way to submit a completed checklist later (partial workflow).
Choose exactly what data lives on the device and how long it stays there. Caching everything increases storage use and privacy risk. Keep it tied to the screens users actually need.
Define sync behavior before you build screens: when sync happens (on open, on Wi-Fi, on manual tap), how retries work, and what happens when the same record changes on the server and on the phone. If you don’t want complex conflict handling, avoid editing shared records offline. Prefer queued actions the server can apply in order.
Make offline visible. Users need signals like an offline banner, “Last synced” time, and a queue count for pending actions. Plan these as separate UI states (online, offline, syncing, error) so QA can test them reliably.
Finally, write a recovery story. If the user reinstalls, runs out of storage, or logs out mid-queue, the app should explain what happens next and how to safely resume.
Permissions become a problem when they feel random. Tie each permission to a clear, user-visible moment. If the first thing your app does is ask for Camera, Location, and Notifications, many people will tap "Don’t Allow" and never recover.
Make permission requests part of the flow. Ask for camera access only after the user taps "Scan barcode" and show one sentence explaining why: "We use the camera to scan the code so you don’t have to type it." Keep the language plain and specific.
Also design a path that still works without permission. A field technician might deny GPS on a shared device. Give them a manual address mode, a limited list view, or a "remind me later" option.
Keep these decisions in scope so QA and release reviews move faster:
Include a small platform notes table so nobody assumes iOS and Android behave the same:
| Capability | iOS notes | Android notes |
|---|---|---|
| Camera | Add clear purpose text | Handle permission + possible "Never ask again" |
| GPS | Prefer "only while using" when possible | Background tracking needs extra review |
| Biometrics | Always include passcode fallback | Allow device credential fallback |
| Offline storage | Define what’s cached and for how long | Plan for low-storage cleanup |
If you’re building in AppMaster, treat permissions as part of UX design, not a toggle. Write the “denied” screens early. That’s where support tickets usually come from.
Most delays happen when a feature works on your phone, but breaks under real conditions: weak signal, a tired user, or a privacy reviewer asking, “Why do you need this?” The fastest fix is usually not building more. It’s defining the missing decisions.
A common blocker is requesting permissions the moment the app opens. Reviewers want a reason tied to an action. If the user hasn’t tapped “Scan barcode,” a camera prompt feels suspicious. Location is similar: if the only goal is finding a service address, manual entry or a one-time lookup can be enough.
QA also gets stuck on unfinished flows. Camera features often ship without retake, a clear cancel path, or upload retry when the connection drops. Offline work is another trap: it’s not a switch. It’s a set of states (what works, what queues, what sync does, and what happens on conflicts).
Common scope gaps that add days:
Before you promise camera, GPS, biometrics, or offline mode, run a sanity check. It prevents late surprises like permission denials, unclear fallbacks, and QA cases nobody planned.
Write the user goal in one sentence for each feature. If you can’t say who needs it and why, it’s not ready for the sprint.
Then map the happy path and the fallback path. Example: a driver scans a barcode (happy path). If camera permission is denied, they can type the code manually or pick from a recent jobs list (fallback). The fallback is part of the feature, not an add-on.
Use this checklist to commit to scope:
A small field technician app shows the matrix in action. The goal is straightforward: a tech opens a job, performs an inspection, adds photos and notes, and submits a final report. The office team reviews it and schedules follow-ups.
Here’s an example v1 matrix that keeps scope clear and avoids permission surprises:
| Capability | What we ship in v1 | Permission moment | UX decisions that prevent rework |
|---|---|---|---|
| Camera | Take 1+ photos per job, with retake. Compress before upload. Upload only on Wi-Fi by default (with an override). | Ask only when the user taps “Add photo”. | Show a preview, “Retake” and “Use photo”. Explain upload rules near the Save button. |
| GPS | Attach one location to a job when the tech taps “Set location”. No background tracking. | Ask only when the user taps “Set location”. | Provide “Use current location” and “Enter address instead”. Store accuracy (for review) but don’t block submission. |
| Biometrics | Re-authenticate with Face ID/Touch ID (or Android equivalent) right before “Submit final report”. | No extra OS permission prompt, but user must enable biometrics in the app settings. | Always offer a fallback (PIN/password). If biometrics fails, don’t lock the user out of the job. |
| Offline storage | Save drafts (notes + checklist state) and photos locally. Sync when online. | No permission prompt in most cases. | Show an “Offline” badge and a clear “Syncing…” status. Prevent duplicate submissions. |
Before build, agree on a few pass/fail checks for review and QA:
In AppMaster, this matrix maps cleanly to screens (job details, photo capture, submit flow), business rules (when to ask, when to sync), and data fields (draft status, location, photo metadata).
Once your matrix is filled, convert each cell into something a team can build and test. Turn it into user stories with acceptance criteria, so nobody argues later about what “offline” or “GPS” meant.
Write stories around outcomes, not sensors. Example: “As a technician, I can attach up to 3 photos to a job, and if I deny camera access I can still upload from my library.” Then add criteria for permissions, error states, and the fallback path.
Keep the build plan small on purpose. Pick one thin feature slice (one screen, one flow, one capability), test it on real devices, then expand based on what you learn. Shipping camera + offline + GPS all at once multiplies QA and review risk.
If you decide to implement this with AppMaster (appmaster.io), the same matrix can double as a build checklist: data model decisions in the Data Designer, edge-case logic in the Business Process Editor, and explicit UI states in the mobile UI builder. That keeps scope, UX, and testing aligned as requirements change.
A feature planning matrix is a one-page table that forces clear decisions before you build. It turns “add GPS” or “support offline” into testable scope by capturing the user goal, the happy path, permissions timing, failure paths, and basic QA checks.
Start with one sentence describing the user’s job, then write the simplest happy path that completes it. Add exactly when you’ll request permission, what happens on deny, what data is stored on-device, and 3–5 failure cases QA can reproduce quickly.
Ask right before the user takes an action that clearly needs it, like tapping “Add photo” or “Set location.” Pair it with a short in-app explanation so the prompt doesn’t feel random, and always include a usable path if the user denies access.
A good fallback still lets the user finish the task, even if it’s less convenient. For example, manual entry instead of scanning, selecting an address instead of GPS, or using PIN/password instead of biometrics, with a clear way to retry later.
Decide what “done” means: capture new photo, pick from gallery, or scan a document, and don’t mix goals in v1. Define retake/cancel behavior, upload timing (immediate vs on submit), and what happens when upload fails so users don’t lose work.
Be specific about whether you need a one-time location stamp, background tracking, or route logging. Most business apps only need “capture once on tap,” which reduces permission burden, battery impact, and review questions.
Treat biometrics as a convenience layer, not the only way in. Make it opt-in after sign-in, use it for quick re-auth or sensitive actions, and always provide a fallback like password or PIN so users can’t get locked out.
Pick a minimum offline goal such as read-only access or saving drafts, then define what data is stored locally and for how long. Decide when sync runs, how retries work, and how you prevent duplicate submissions when the network returns.
Write acceptance criteria around observable behavior, not intentions. Include at least one pass/fail check for denied permission, missing hardware, poor connectivity, and recovery after app restart, so QA can validate the same rules every time.
Use the matrix to map each capability to screens, data fields, and edge-case logic before wiring anything up. In AppMaster, that typically means defining the data in the Data Designer, handling permission and failure flows in the Business Process Editor, and building explicit UI states in the mobile UI builder so scope changes don’t create messy patches.
Experiment with AppMaster with free plan.
When you will be ready you can choose the proper subscription.


