


Equipment reservation app: prevent conflicts and track returns
Plan an equipment reservation app that prevents double bookings, records returns and damage, and places faulty items on maintenance hold.
Design an equipment checkout system that supports barcodes, reservations, and handoff logs, with fast mobile updates for teams working in the field.
An equipment checkout system should answer a few basic questions quickly: Where is the item right now, who has it, and when is it coming back? When those answers aren’t clear, the same problems repeat: tools go missing, teams argue about who had something last, and work stalls because an “available” item is actually on another site.
Spreadsheets can work when one person updates them and everything stays in one place. They fall apart once multiple crews, trucks, and locations are involved. The file drifts behind reality, updates get missed, and people stop trusting the data. Then they stop checking and start guessing.
“Checkout” is more than “Bob took the drill.” A useful system captures custody (who is responsible), time (when it left and when it’s due back), condition (working, damaged, missing parts), and context (from which location, to which job, under which supervisor). When those details are consistent, you can resolve disputes and prevent repeat issues instead of chasing them.
It also cuts the quiet costs that show up later: rush purchases because gear can’t be found, extra rentals because returns are late, and write-offs because there’s no proof of what happened.
Different teams need the same truth for different reasons. Warehouse staff need fast handoff and accurate stock. Field crews need quick pickup, transfers, and simple returns. Supervisors need visibility to plan work and avoid conflicts. Finance and ops need utilization, loss rates, and replacement history.
A good equipment checkout system isn’t “more fields.” It’s a small set of building blocks that behave the same way for every tool, kit, and vehicle.
Start with assets. Decide what you track as a single item (a drill), what you track as a bundle (a camera kit), and what you don’t track individually (consumables like tape). For consumables, track quantity by location instead of forcing a scan for every unit. For non-consumables, give each item a unique ID that matches its barcode.
Next are people. Keep it simple: you need to know who can borrow, who can approve exceptions, and who can audit. One person can have multiple roles, but the roles should be clear when something goes missing.
Locations are the third pillar. Treat every place equipment can live as a location, even if it moves. A truck can be a location, and so can a job-site container or remote storage.
Keep statuses few and strict so reports stay trustworthy. Most teams can cover real life with:
Then record changes as events. An event is what happened, when it happened, where it happened, and who did it. If you capture events well, you can always rebuild the story later.
A practical set of events includes scan out, scan in, transfer, maintenance, and write-off. If a generator is scanned from “Warehouse A” to “Truck 12,” that’s a transfer, not a checkout. Checkout is when responsibility moves to a person or crew.
A good data model does two things: it makes scanning fast in the field, and it keeps enough history to answer “who had it, when, and in what shape.” You can get there with a small set of records and clear rules for what changes state.
Start with a few core objects, then add only what you can keep accurate:
Keep “people” and “locations” as simple reference tables (name, team, contact; site name, area) so you can filter and report later.
Condition tracking only works when it’s easy. Use a small set of options like Good, Needs attention, Damaged, Missing parts. Record condition at moments that matter: checkout, return, and when marking an item as in repair.
Photos should be optional most of the time and required only when condition isn’t “Good” or when disputes are likely (cracked screen, missing battery, bent tripod). That keeps the workflow fast while still capturing proof when it counts.
A practical rule: reservations prevent double booking, but they don’t change asset status on their own. Status changes happen on scans (checked out, returned, transferred) and create both a handoff entry and an audit entry.
Example: a tech reserves “Laser Level 03” for 9am-1pm at Warehouse A with job ref “J-1842.” At pickup, they scan the barcode, set condition to Good, and sign. If the tool is later transferred to another crew, a new handoff is created with both names, time, and signature, and the audit trail records the status and location change.
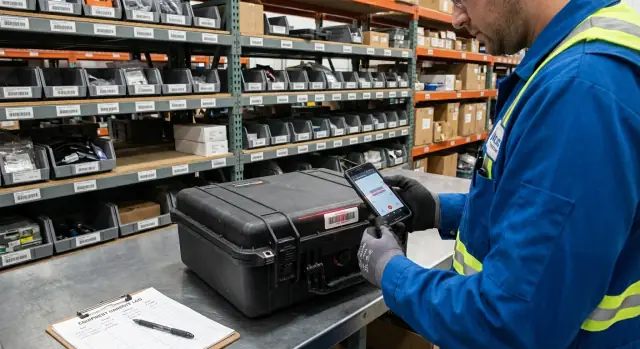
A barcode scan should do more than “find the item.” Each scan should create a clear update: who has it, where it is, what shape it’s in, and what happens next.
Keep actions consistent so people can do them one-handed, in bad light, and under time pressure:
Always show a confirmation screen before saving, especially when multiple similar assets sit next to each other.
Field work often happens with poor signal. Don’t block the workflow. Save scans locally and sync later, but still collect the facts that matter: timestamp, action type, person or team, location, and condition with a short note.
Reservations can either build trust or create daily friction. The goal is to stop double-booking and last-minute surprises without turning every checkout into paperwork.
Start with a few clear rules that match how your team actually works, and keep them visible in the app:
Handle conflicts automatically, with choices people can act on. If two people want the same camera for the same morning, don’t just block the second request. Offer options like a waitlist, a different unit, or a shorter time window. If you track multiple identical items, reserve by “asset type” first, then assign the specific serial-numbered unit at pickup.
No-shows and late returns need predictable consequences. A simple pattern works: send an alert before pickup, mark as “no-show” after a grace period, then release it. For late returns, notify the current holder first, then escalate if the item blocks another reservation.
Walk-up checkout is the real test. If an item is reserved but still on the shelf, the scan flow should warn the user and show the next reservation with time and owner. A supervisor can override with a note, or the system can suggest an alternative unit to keep work moving.
Example: A technician scans a tripod at 8:55. The app warns it’s reserved at 9:00 for another crew and shows two available tripods nearby. The tech grabs an alternative and the reservation stays intact.
A handoff log is your last line of defense when an item goes missing, gets damaged, or shows up on the wrong site. Make it easy to record who had what, when, and in what condition, without slowing people down.
Every handoff record should capture the basics consistently: the asset (or kit), the person giving it, the person receiving it, the time, the location, and the action (checkout, return, transfer, sent to repair). Treat the log as append-only history. Edits should be rare and visible.
Signatures matter, but they should match the risk. A typed name is often enough for low-cost gear. A PIN works well when devices are shared. A touch signature can help when teams expect “sign here,” but it can also slow lines down with gloves, rain, or cracked screens.
Photos are best when the condition is hard to describe. A single photo of a cracked screen or bent connector can prevent arguments later. But requiring photos for every scan creates friction, and people will work around it. Make photos optional, or required only for statuses like “returned damaged” or “missing parts.”
A short condition checklist helps avoid vague notes like “looks fine.” Keep it specific per asset type and quick to tap:
Chain of custody is where disputes usually start. If a drill goes from Team A to Team B, record it as a transfer between two people, not a return and a new checkout later.
Example: Maria transfers a laser level to Dev. Dev confirms with a PIN, adds “tripod included,” and snaps one photo because the case latch is broken. That single clear record ends most arguments.
A field app works when someone can finish a checkout in seconds with one hand while standing next to a rack or truck bed. Treat scanning as the main action and make everything else feel secondary.
Start with a home screen that’s essentially “Scan” plus a backup search. The camera scan should open instantly, but always offer a manual path for damaged labels or low light.
A clean flow looks like this:
On the confirm screen, show asset name, photo (if you have it), current holder, and status in one glance. Big buttons reduce mistakes, especially with gloves.
The details screen should feel like a quick receipt, not a report. Include borrower (or receiving team), due date (optional), condition, and a notes field. Use smart defaults: prefill recent people and locations, default the due date to “end of shift,” and keep the last-used condition unless changed.
Small choices add up: keep the primary button in the same place, cache “last used” values for one-tap picks, support offline capture and later sync, and use sound or vibration to confirm a successful scan.
For errors, be blunt and helpful. If the wrong asset is scanned, show “Not the right item?” with a rescan button. If it’s already checked out, show who has it and offer “View log” or “Check in.” If the label won’t read, fall back to search by asset tag or a short ID printed under the barcode.
Be strict about what you’re tracking. Not everything needs a unique ID. A bundle of zip ties can be counted, but a generator, tablet, laser level, or calibration tool should have its own record so you can always answer: who has it, where is it, and when did it move.
A practical rollout sequence:
Then pilot with a small group for one week. Let one crew scan items onto their truck in the morning, transfer a tool at lunch, and return everything at the end of the week. Watch where they pause, what they type, and what they skip.
Refine based on real field behavior: fewer required fields, a bigger scan button, clearer status names.
Most equipment checkout systems fail because the “perfect” process is too slow on a busy day. If a step feels optional, people skip it. Data drifts until nobody trusts it.
Condition tracking is a common trap. Teams try to record every scratch, then stop recording condition at all. Keep it fast: a few condition choices and one photo when something is wrong.
Edits without an audit trail are another quiet failure. If someone can change who had an item last, disputes turn into guesswork. Keep the original event intact and add a correction event instead.
Offline support gets ignored until the first job site with weak service. If scanning fails, people write notes and “fix it later.” Later rarely happens. Make sure scans, photos, and signatures can queue locally and sync when the phone reconnects.
Mixing consumables and assets in the same workflow also causes confusion. A drill is checked out and returned. A box of anchors is issued and depleted. Treat them differently so counts and accountability stay clear.
A few checks that prevent most pain:
Example: a label peels off a generator, so someone types a serial number from memory and picks the wrong record. A good system prevents this by enforcing unique codes, making replacement labels easy, and logging label swaps as events.
A good equipment checkout system feels boring in the best way. People can do the right thing quickly, and managers can answer questions without chasing texts.
If scanning is slow, people stop using it. The fastest flow is: scan asset, confirm person (or auto-fill), tap action, done.
Ask:
A system fails when it can’t separate plans from reality. Reservations are intentions. Checkouts are facts.
Ask:
For a first version, three views usually cover most needs: a Scan/Action view for techs, an Overdue view for supervisors, and an Asset History view for anyone handling disputes.
A small crew has a two-day install across town. They need three pre-packed kits (each kit is a tote with standard parts), one calibrated tester device, and a ladder. The supervisor creates a reservation for tomorrow 7:00 AM to the end of day two, assigns it to the job, and adds the five items.
At pickup, the warehouse tech opens the reservation and scans each barcode. Each scan confirms the exact asset (not just the item type) and flips its status to Checked out, tied to the person and the job. The ladder and tester disappear from “available” immediately, so they aren’t promised to another team.
By lunch, one technician heads to a second site for a surprise issue. They transfer the tester device to her without calling the warehouse. In the mobile app, the first tech chooses Transfer, scans the tester, then scans the receiving tech’s badge (or selects her name). The record now shows who has it, when it moved, and where it happened.
At return on day two, the ladder comes back with a bent rung. The warehouse tech scans it in, marks condition as Damaged, adds a quick note (“bent rung, unsafe”), and changes status to Needs repair. The rest of the items scan back to Available, ready for the next reservation.
This one job produces a clean trail:
If the tester isn’t scanned back by end of day two, the supervisor sees an overdue alert tied to the reservation and can open the timeline to see the last scan and current holder.
Start small on purpose. Pick one location (or one team) and label a focused set of assets, usually 50 to 200. That’s enough volume to expose real problems: missing labels, confusing statuses, slow checkouts, and the odd workflow nobody mentioned.
Before you add more screens, assign ownership. Someone needs to own label printing and placement, quick audits (weekly or biweekly), and honest repair updates. If those jobs are “everyone’s job,” they become no one’s job.
For the pilot, keep the plan measurable:
If you want to build the system without code, AppMaster (appmaster.io) is one option that can generate a full backend, a web admin app, and native mobile apps around the same data model and event log.
Put a review date on the calendar after 2 to 4 weeks. Tighten the forms, rename confusing statuses, and adjust rules based on real usage, not guesses.
Track anything that’s expensive, safety-critical, hard to replace, or frequently shared across crews. For low-cost consumables, a simple per-location quantity works better than forcing a scan for every unit.
Keep it strict and small so the data stays trustworthy: who is responsible, where it is, when it moved, and its condition. Add extra fields only if someone will reliably fill them out under time pressure.
Use reservations to prevent double-booking, but don’t let a reservation change the asset’s real status by itself. Make the actual scan-out and scan-in the only actions that flip status, and show upcoming reservations during checkout to avoid surprises.
Treat a truck as a location, not a person. That way you can transfer gear onto the truck at the start of the day, then check items out to people only when responsibility truly changes.
Use an append-only event log where each scan creates a timestamped record with “from” and “to,” plus the person and location. If something needs fixing, add a correction event instead of editing history, so you can always reconstruct what happened.
Don’t block the workflow. Save scans locally with timestamp, action, person/team, location, and condition, then sync later; otherwise people will write notes and the system will drift behind reality.
Make the “Good” path fast and the “problem” path detailed. Use a few condition options and require a photo only when the condition isn’t Good or when parts are missing, so you get evidence without slowing every return.
Show a clear warning that the item is reserved, who it’s reserved for, and when it’s needed. Then offer a practical next step like choosing another available unit or letting a supervisor override with a short note.
Start with one location and about 50 to 200 assets so issues show up quickly. Build only four core flows first—checkout, return, transfer, repair—then pilot for a week, watch where people hesitate, and remove any required fields they skip.
Yes, if you build around a clean data model (assets, people, locations, events) and keep scan actions consistent. AppMaster can generate the backend, a web admin app, and native mobile apps from the same logic, which helps you iterate quickly as the pilot reveals real workflow gaps.
Experiment with AppMaster with free plan.
When you will be ready you can choose the proper subscription.


